HP LaserJet 5000 HP LaserJet 5000, 5000 N, 5000 GN, and 5000 DN Printers - Us - Page 43
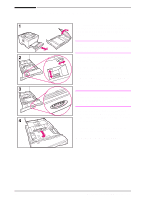
Loading Tray 2/Optional 250-Sheet Tray, inside the tray.
 |
View all HP LaserJet 5000 manuals
Add to My Manuals
Save this manual to your list of manuals |
Page 43 highlights
Loading Tray 2/Optional 250-Sheet Tray The following instructions are for loading Tray 2 or an optional 250-sheet paper tray. For supported sizes of paper, see page A-4. Note To avoid paper jams, do not load trays while the printer is printing. 1 Pull the tray completely out of the printer. Lift the tray cover. 2 Rotate the dial in the tray so the printer will read the correct size of paper. The toggle switch accesses more sizes. An error message will appear in the control panel display if the dial is not set properly. Note Setting the dial adjusts the printer's sensors. It does not adjust the guides inside the tray. 3 Make sure the paper size setting matches the size of paper loaded, or the printer might jam or other errors might occur. 4 Tilt the blue rear guide toward the front of the tray to detach it. Continued on the next page. EN Chapter 2: Printing Tasks 31
-
 1
1 -
2
-
3
-
4
-
5
-
6
-
7
-
8
-
9
-
10
-
11
-
12
-
13
-
14
-
15
-
16
-
17
-
18
-
19
-
20
-
21
-
22
-
23
-
24
-
25
-
26
-
27
-
28
-
29
-
30
-
31
-
32
-
33
-
34
-
35
-
36
-
37
-
 38
38 -
 39
39 -
 40
40 -
 41
41 -
 42
42 -
 43
43 -
 44
44 -
 45
45 -
 46
46 -
 47
47 -
 48
48 -
49
-
50
-
51
-
52
-
53
-
54
-
55
-
56
-
57
-
58
-
59
-
60
-
61
-
62
-
63
-
64
-
65
-
66
-
67
-
68
-
69
-
70
-
71
-
72
-
73
-
74
-
75
-
76
-
77
-
78
-
79
-
80
-
81
-
82
-
83
-
84
-
85
-
86
-
87
-
88
-
89
-
90
-
91
-
92
-
93
-
94
-
95
-
96
-
97
-
98
-
99
-
100
-
101
-
102
-
103
-
104
-
105
-
106
-
107
-
108
-
109
-
110
-
111
-
112
-
113
-
114
-
115
-
116
-
117
-
118
-
119
-
120
-
121
-
122
-
123
-
124
-
125
-
126
-
127
-
128
-
129
-
130
-
131
-
132
-
133
-
134
-
135
-
136
-
137
-
138
-
139
-
140
-
141
-
142
-
143
-
144
-
145
-
146
-
147
-
148
-
149
-
150
-
151
-
152
-
153
-
154
-
155
-
156
-
157
-
158
-
159
-
160
-
161
-
162
-
163
-
164
-
165
-
166
-
167
-
168
-
169
-
170
-
171
-
172
-
173
-
174
-
175
-
176
-
177
-
178
-
179
-
180
-
181
-
182
-
183
-
184
-
185
-
186
-
187
-
188
-
189
-
190
-
191
-
192
-
193
-
194
-
195
-
196
-
197
-
198
-
199
-
200
-
201
-
202
-
203
-
204
 |
 |
