HP LaserJet 5000 HP LaserJet 5000, 5000 N, 5000 GN, and 5000 DN Printers - Us - Page 64
set properly., control panel display if the dial is
 |
View all HP LaserJet 5000 manuals
Add to My Manuals
Save this manual to your list of manuals |
Page 64 highlights
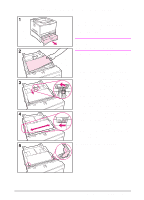
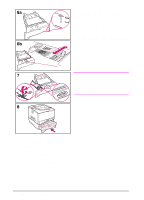
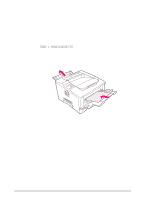
6a When loading a full stack of media, continue to step 6B. Otherwise, proceed to step 7. 6b Align the tension lever up or down to match the symbol displayed in the tension indicator window. 7 To prevent jams, rotate the dial in the tray so the printer will read the correct size of paper. The toggle switch accesses more sizes. An error message will appear in the control panel display if the dial is not set properly. 8 Slide the tray into the printer. Note If you want to print by type and size of paper from the printer driver, configure the tray settings in the printer's control panel to match the type of paper loaded in each tray (page 60). 52 Chapter 2: Printing Tasks EN
-
 1
1 -
2
-
3
-
4
-
5
-
6
-
7
-
8
-
9
-
10
-
11
-
12
-
13
-
14
-
15
-
16
-
17
-
18
-
19
-
20
-
21
-
22
-
23
-
24
-
25
-
26
-
27
-
28
-
29
-
30
-
31
-
32
-
33
-
34
-
35
-
36
-
37
-
38
-
39
-
40
-
41
-
42
-
43
-
44
-
45
-
46
-
47
-
48
-
49
-
50
-
51
-
52
-
53
-
54
-
55
-
56
-
57
-
58
-
 59
59 -
 60
60 -
 61
61 -
 62
62 -
 63
63 -
 64
64 -
 65
65 -
 66
66 -
 67
67 -
 68
68 -
 69
69 -
70
-
71
-
72
-
73
-
74
-
75
-
76
-
77
-
78
-
79
-
80
-
81
-
82
-
83
-
84
-
85
-
86
-
87
-
88
-
89
-
90
-
91
-
92
-
93
-
94
-
95
-
96
-
97
-
98
-
99
-
100
-
101
-
102
-
103
-
104
-
105
-
106
-
107
-
108
-
109
-
110
-
111
-
112
-
113
-
114
-
115
-
116
-
117
-
118
-
119
-
120
-
121
-
122
-
123
-
124
-
125
-
126
-
127
-
128
-
129
-
130
-
131
-
132
-
133
-
134
-
135
-
136
-
137
-
138
-
139
-
140
-
141
-
142
-
143
-
144
-
145
-
146
-
147
-
148
-
149
-
150
-
151
-
152
-
153
-
154
-
155
-
156
-
157
-
158
-
159
-
160
-
161
-
162
-
163
-
164
-
165
-
166
-
167
-
168
-
169
-
170
-
171
-
172
-
173
-
174
-
175
-
176
-
177
-
178
-
179
-
180
-
181
-
182
-
183
-
184
-
185
-
186
-
187
-
188
-
189
-
190
-
191
-
192
-
193
-
194
-
195
-
196
-
197
-
198
-
199
-
200
-
201
-
202
-
203
-
204
 |
 |

52
Chapter 2:
Printing Tasks
EN
6a
When loading a full stack of
media, continue to step 6B.
Otherwise, proceed to step 7.
6b
Align the tension lever up or down
to match the symbol displayed in
the tension indicator window.
7
To prevent jams, rotate the dial in the
tray so the printer will read the
correct size of paper. The toggle
switch accesses more sizes. An
error message will appear in the
control panel display if the dial is not
set properly.
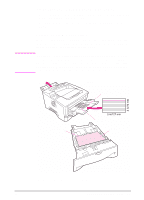
8
Slide the tray into the printer.
Note
If you want to print by type and size of
paper from the printer driver, configure
the tray settings in the printer’s control
panel to match the type of paper loaded
in each tray (page 60).