HP LaserJet M1120 Service Manual - Page 140
Scan problems, Solve scanned-image problems
 |
View all HP LaserJet M1120 manuals
Add to My Manuals
Save this manual to your list of manuals |
Page 140 highlights
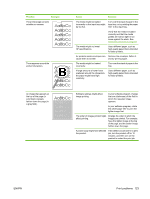
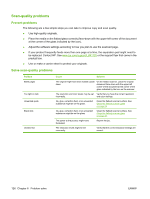
Scan problems Solve scanned-image problems Problem The scanned image is of poor quality. Part of the image did not scan. Cause Solution The original might be a second-generation ● photo or picture. ● ● The image that appears on the screen might ● not be an accurate representation of the quality of the scan. ● To eliminate the patterns, try reducing the size of the image after scanning. Print the scanned image to see if the quality is better. Verify that the resolution settings are correct for the type of scan job that you are performing. Try adjusting your computer monitor settings to use more colors (or levels of gray). Typically, you make this adjustment by opening Display in Windows Control Panel. Try adjusting the resolution settings in the scanner software. The original might have been loaded incorrectly. Verify that the original is loaded correctly on the flatbed scanner. See Install input devices on page 19. The scanner might be dirty. Clean the scanner. See Clean the flatbed scanner glass on page 28. The graphics settings might not be suitable Try changing the graphics settings. for the type of scan job that you are performing. The original might have been loaded incorrectly. Verify that the original is loaded correctly on the flatbed scanner. A colored background might be causing images in the foreground to blend into the background. Try adjusting the settings before you scan the original or enhancing the image after you scan the original. The original is too small. The minimum size that the flatbed scanner supports is 25 x 25 mm (1 x 1 inch). The media size is incorrect. In Scan settings, make sure that the input media size is large enough for the document that you are scanning. . 124 Chapter 6 Problem solve ENWW
-
 1
1 -
2
-
3
-
4
-
5
-
6
-
7
-
8
-
9
-
10
-
11
-
12
-
13
-
14
-
15
-
16
-
17
-
18
-
19
-
20
-
21
-
22
-
23
-
24
-
25
-
26
-
27
-
28
-
29
-
30
-
31
-
32
-
33
-
34
-
35
-
36
-
37
-
38
-
39
-
40
-
41
-
42
-
43
-
44
-
45
-
46
-
47
-
48
-
49
-
50
-
51
-
52
-
53
-
54
-
55
-
56
-
57
-
58
-
59
-
60
-
61
-
62
-
63
-
64
-
65
-
66
-
67
-
68
-
69
-
70
-
71
-
72
-
73
-
74
-
75
-
76
-
77
-
78
-
79
-
80
-
81
-
82
-
83
-
84
-
85
-
86
-
87
-
88
-
89
-
90
-
91
-
92
-
93
-
94
-
95
-
96
-
97
-
98
-
99
-
100
-
101
-
102
-
103
-
104
-
105
-
106
-
107
-
108
-
109
-
110
-
111
-
112
-
113
-
114
-
115
-
116
-
117
-
118
-
119
-
120
-
121
-
122
-
123
-
124
-
125
-
126
-
127
-
128
-
129
-
130
-
131
-
132
-
133
-
134
-
 135
135 -
 136
136 -
 137
137 -
 138
138 -
 139
139 -
 140
140 -
 141
141 -
 142
142 -
 143
143 -
 144
144 -
 145
145 -
146
-
147
-
148
-
149
-
150
-
151
-
152
-
153
-
154
-
155
-
156
-
157
-
158
-
159
-
160
-
161
-
162
-
163
-
164
-
165
-
166
-
167
-
168
-
169
-
170
-
171
-
172
-
173
-
174
-
175
-
176
-
177
-
178
-
179
-
180
-
181
-
182
-
183
-
184
-
185
-
186
-
187
-
188
-
189
-
190
-
191
-
192
-
193
-
194
-
195
-
196
-
197
-
198
-
199
-
200
-
201
-
202
-
203
-
204
-
205
-
206
-
207
-
208
-
209
-
210
-
211
-
212
-
213
-
214
-
215
-
216
-
217
-
218
-
219
-
220
-
221
-
222
-
223
-
224
 |
 |