HP LaserJet M1120 Service Manual - Page 65
Electrostatic discharge, Required tools, Before performing service
 |
View all HP LaserJet M1120 manuals
Add to My Manuals
Save this manual to your list of manuals |
Page 65 highlights
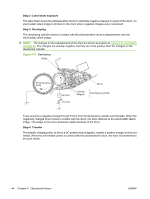
Electrostatic discharge CAUTION: The product contains components that are sensitive to electrostatic discharge (ESD). Always perform service work at ESD-protected workstation. If an ESD-protected workstation is not available, discharge body static by grasping the print engine chassis before touching an ESD- sensitive component. Ground the print engine chassis before servicing the product. Required tools ● #2 Phillips screwdriver with magnetic tip ● Small flat-blade screwdriver ● Long flat-blade screwdriver ● Needle-nose pliers ● ESD mat (if one is available) ● Penlight (optional) CAUTION: Always use a Phillips screwdriver (callout 1). Do not use a pozidrive screwdriver (callout 2) or any motorized screwdriver. These can damage screws or screw threads. Do not pull directly on the wires to disconnect them. Always pull on the plastic body of a connector to avoid damaging the connector wires. Figure 5-1 Phillips and pozidrive screwdriver comparison Before performing service ● If possible, print a configuration page (to record customer settings) and menu map report. See Information pages on page 30. ● Remove all media from the product and remove the input tray. ● Turn off the power by using the power switch. ● Unplug the power and interface cables. ENWW Removal and replacement strategy 49
-
 1
1 -
2
-
3
-
4
-
5
-
6
-
7
-
8
-
9
-
10
-
11
-
12
-
13
-
14
-
15
-
16
-
17
-
18
-
19
-
20
-
21
-
22
-
23
-
24
-
25
-
26
-
27
-
28
-
29
-
30
-
31
-
32
-
33
-
34
-
35
-
36
-
37
-
38
-
39
-
40
-
41
-
42
-
43
-
44
-
45
-
46
-
47
-
48
-
49
-
50
-
51
-
52
-
53
-
54
-
55
-
56
-
57
-
58
-
59
-
 60
60 -
 61
61 -
 62
62 -
 63
63 -
 64
64 -
 65
65 -
 66
66 -
 67
67 -
 68
68 -
 69
69 -
 70
70 -
71
-
72
-
73
-
74
-
75
-
76
-
77
-
78
-
79
-
80
-
81
-
82
-
83
-
84
-
85
-
86
-
87
-
88
-
89
-
90
-
91
-
92
-
93
-
94
-
95
-
96
-
97
-
98
-
99
-
100
-
101
-
102
-
103
-
104
-
105
-
106
-
107
-
108
-
109
-
110
-
111
-
112
-
113
-
114
-
115
-
116
-
117
-
118
-
119
-
120
-
121
-
122
-
123
-
124
-
125
-
126
-
127
-
128
-
129
-
130
-
131
-
132
-
133
-
134
-
135
-
136
-
137
-
138
-
139
-
140
-
141
-
142
-
143
-
144
-
145
-
146
-
147
-
148
-
149
-
150
-
151
-
152
-
153
-
154
-
155
-
156
-
157
-
158
-
159
-
160
-
161
-
162
-
163
-
164
-
165
-
166
-
167
-
168
-
169
-
170
-
171
-
172
-
173
-
174
-
175
-
176
-
177
-
178
-
179
-
180
-
181
-
182
-
183
-
184
-
185
-
186
-
187
-
188
-
189
-
190
-
191
-
192
-
193
-
194
-
195
-
196
-
197
-
198
-
199
-
200
-
201
-
202
-
203
-
204
-
205
-
206
-
207
-
208
-
209
-
210
-
211
-
212
-
213
-
214
-
215
-
216
-
217
-
218
-
219
-
220
-
221
-
222
-
223
-
224
 |
 |