HP Latex 560 User Guide - Page 146
Replace an intermediate tank
 |
View all HP Latex 560 manuals
Add to My Manuals
Save this manual to your list of manuals |
Page 146 highlights
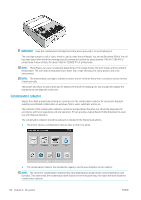
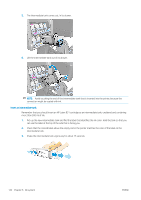
4. Put the new cartridge into its correct place on the printer. 5. Check that the rubber part around the needle in the cartridge connector is clean. Clean gently with a cloth if necessary. 6. Connect the connector to the cartridge. Replace an intermediate tank Intermediate tanks should be replaced for the following reasons: ● The printer notifies you that the intermediate tank has reached the end of its life and will not be refilled. When it runs out of ink, it must be replaced. NOTE: The pause to replace the tank may affect the print quality of the job. ● You want to continue printing without replacing an empty large ink cartridge. In this case, you must declare it in the front panel, and you will need to replace the intermediate tank with a new one when it, too, becomes empty. See Stop refilling an intermediate tank on page 144. WARNING! Make sure that the printer wheels are locked (the brake lever is pressed down) to prevent the printer from moving. CAUTION: The procedure to remove an intermediate tank must be initiated from the front panel. Do not remove an intermediate tank until the front panel prompts you. If you remove an intermediate tank incorrectly, the printer may subsequently reject that tank. CAUTION: Remove an intermediate tank only if you are ready to insert another one. CAUTION: Observe precautions when handling intermediate tanks because they are ESD-sensitive devices. Avoid touching pins, leads, or circuitry. NOTE: You cannot replace an intermediate tank while it has a padlock icon displayed on the front panel. You must press Replace intermediate tanks as described below to remove the padlock. 140 Chapter 6 Ink system ENWW
-
 1
1 -
2
-
3
-
4
-
5
-
6
-
7
-
8
-
9
-
10
-
11
-
12
-
13
-
14
-
15
-
16
-
17
-
18
-
19
-
20
-
21
-
22
-
23
-
24
-
25
-
26
-
27
-
28
-
29
-
30
-
31
-
32
-
33
-
34
-
35
-
36
-
37
-
38
-
39
-
40
-
41
-
42
-
43
-
44
-
45
-
46
-
47
-
48
-
49
-
50
-
51
-
52
-
53
-
54
-
55
-
56
-
57
-
58
-
59
-
60
-
61
-
62
-
63
-
64
-
65
-
66
-
67
-
68
-
69
-
70
-
71
-
72
-
73
-
74
-
75
-
76
-
77
-
78
-
79
-
80
-
81
-
82
-
83
-
84
-
85
-
86
-
87
-
88
-
89
-
90
-
91
-
92
-
93
-
94
-
95
-
96
-
97
-
98
-
99
-
100
-
101
-
102
-
103
-
104
-
105
-
106
-
107
-
108
-
109
-
110
-
111
-
112
-
113
-
114
-
115
-
116
-
117
-
118
-
119
-
120
-
121
-
122
-
123
-
124
-
125
-
126
-
127
-
128
-
129
-
130
-
131
-
132
-
133
-
134
-
135
-
136
-
137
-
138
-
139
-
140
-
 141
141 -
 142
142 -
 143
143 -
 144
144 -
 145
145 -
 146
146 -
 147
147 -
 148
148 -
 149
149 -
 150
150 -
 151
151 -
152
-
153
-
154
-
155
-
156
-
157
-
158
-
159
-
160
-
161
-
162
-
163
-
164
-
165
-
166
-
167
-
168
-
169
-
170
-
171
-
172
-
173
-
174
-
175
-
176
-
177
-
178
-
179
-
180
-
181
-
182
-
183
-
184
-
185
-
186
-
187
-
188
-
189
-
190
-
191
-
192
-
193
-
194
-
195
-
196
-
197
-
198
-
199
-
200
-
201
-
202
-
203
 |
 |
