HP Latex 560 User Guide - Page 157
CAUTION, Insert a printhead, If the printhead is new
 |
View all HP Latex 560 manuals
Add to My Manuals
Save this manual to your list of manuals |
Page 157 highlights
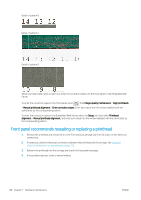
9. Gently pull the blue handle upward until the printhead is released from the carriage. CAUTION: Do not pull abruptly. That action can damage the printhead. CAUTION: If you want to preserve the old printhead for later use, reinstall the cap and plug, but never install a clear optimizer cap or white plug on a non-optimizer printhead. Optimizer printheads have clear caps and white plugs, while the other printheads have orange caps and plugs. Installing the wrong cap and plug can cause irrecoverable printhead damage. 10. The front-panel display identifies the missing printhead. Insert a printhead 1. If the printhead is new, shake it vigorously before removing the protective caps. Hold the printhead upright (with the protective caps facing down) and shake the printhead vigorously in a smooth up and down motion for about 15 seconds. NOTE: Be careful not to strike the printhead against anything while shaking it, because this could cause damage. ENWW Replace a printhead 151
-
 1
1 -
2
-
3
-
4
-
5
-
6
-
7
-
8
-
9
-
10
-
11
-
12
-
13
-
14
-
15
-
16
-
17
-
18
-
19
-
20
-
21
-
22
-
23
-
24
-
25
-
26
-
27
-
28
-
29
-
30
-
31
-
32
-
33
-
34
-
35
-
36
-
37
-
38
-
39
-
40
-
41
-
42
-
43
-
44
-
45
-
46
-
47
-
48
-
49
-
50
-
51
-
52
-
53
-
54
-
55
-
56
-
57
-
58
-
59
-
60
-
61
-
62
-
63
-
64
-
65
-
66
-
67
-
68
-
69
-
70
-
71
-
72
-
73
-
74
-
75
-
76
-
77
-
78
-
79
-
80
-
81
-
82
-
83
-
84
-
85
-
86
-
87
-
88
-
89
-
90
-
91
-
92
-
93
-
94
-
95
-
96
-
97
-
98
-
99
-
100
-
101
-
102
-
103
-
104
-
105
-
106
-
107
-
108
-
109
-
110
-
111
-
112
-
113
-
114
-
115
-
116
-
117
-
118
-
119
-
120
-
121
-
122
-
123
-
124
-
125
-
126
-
127
-
128
-
129
-
130
-
131
-
132
-
133
-
134
-
135
-
136
-
137
-
138
-
139
-
140
-
141
-
142
-
143
-
144
-
145
-
146
-
147
-
148
-
149
-
150
-
151
-
 152
152 -
 153
153 -
 154
154 -
 155
155 -
 156
156 -
 157
157 -
 158
158 -
 159
159 -
 160
160 -
 161
161 -
 162
162 -
163
-
164
-
165
-
166
-
167
-
168
-
169
-
170
-
171
-
172
-
173
-
174
-
175
-
176
-
177
-
178
-
179
-
180
-
181
-
182
-
183
-
184
-
185
-
186
-
187
-
188
-
189
-
190
-
191
-
192
-
193
-
194
-
195
-
196
-
197
-
198
-
199
-
200
-
201
-
202
-
203
 |
 |
