HP Latex 560 User Guide - Page 92
Avoiding substrate jams while printing, Substrate is deformed or wrinkled
 |
View all HP Latex 560 manuals
Add to My Manuals
Save this manual to your list of manuals |
Page 92 highlights
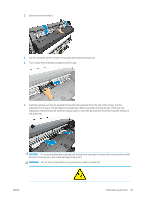
Risk of burns For more safety information, please see Safety precautions on page 3 6. Make sure that there are no pieces of substrate left in the printer. In particular, check in and under the curing module, and in the substrate path. 7. Close the window. 8. Turn on the printer. 9. Reload the roll. 10. If some substrate continues to cause an obstruction within the printer, it can often be cleared by loading a rigid substrate type into the printer. 11. If you find that you have print-quality problems after a jam, try realigning the printheads. See Align the printheads on page 146. Avoiding substrate jams while printing Substrate jams may be caused by loading the substrate with too much skew: do not ignore the warning message that appears during the loading procedure in this case. They may also be caused by not enough vacuum suction in the printing zone. If you decide to increase the suction, do not exceed the following limits: 20 mmH2O for banners and 50 mmH2O for other substrate families. If you experience jams only at the beginning of a print, try the following suggestions. ● Disable the automatic cutter. ● Go to the front panel and press , then Substrate handling options > Extra bottom margin and Extra top margin. Set both margins to 100 mm. If that is not enough, try higher values. ● Increase the vacuum level in steps of 10 mmH2O. Do not exceed the following limits: 20 mmH2O for banners and 50 mmH2O for other substrate families. ● Increase the number of passes. ● Make sure that the substrate is stored in the same room in which the printer is located. ● Try using the substrate edge holders. ● Make sure the curing door is open while loading. See Load a roll into the printer on page 51. When starting to print, ensure that the curing door remains open until the substrate is out of the curing module or the take-up reel is connected, except: - For certain substrates that are able to leave the curing zone successfully. - When the take-up reel is connected before printing. Substrate is deformed or wrinkled If your substrate is deformed or wrinkled by the curing process, change the temperature settings before printing the next job, and advance the substrate, using the Move substrate option in the front panel's Substrate menu, so that the next job will be printed on undamaged substrate. If the problem appears only at the beginning of the print, try the following suggestions. 86 Chapter 3 Handle the substrate and troubleshoot substrate issues ENWW
-
 1
1 -
2
-
3
-
4
-
5
-
6
-
7
-
8
-
9
-
10
-
11
-
12
-
13
-
14
-
15
-
16
-
17
-
18
-
19
-
20
-
21
-
22
-
23
-
24
-
25
-
26
-
27
-
28
-
29
-
30
-
31
-
32
-
33
-
34
-
35
-
36
-
37
-
38
-
39
-
40
-
41
-
42
-
43
-
44
-
45
-
46
-
47
-
48
-
49
-
50
-
51
-
52
-
53
-
54
-
55
-
56
-
57
-
58
-
59
-
60
-
61
-
62
-
63
-
64
-
65
-
66
-
67
-
68
-
69
-
70
-
71
-
72
-
73
-
74
-
75
-
76
-
77
-
78
-
79
-
80
-
81
-
82
-
83
-
84
-
85
-
86
-
 87
87 -
 88
88 -
 89
89 -
 90
90 -
 91
91 -
 92
92 -
 93
93 -
 94
94 -
 95
95 -
 96
96 -
 97
97 -
98
-
99
-
100
-
101
-
102
-
103
-
104
-
105
-
106
-
107
-
108
-
109
-
110
-
111
-
112
-
113
-
114
-
115
-
116
-
117
-
118
-
119
-
120
-
121
-
122
-
123
-
124
-
125
-
126
-
127
-
128
-
129
-
130
-
131
-
132
-
133
-
134
-
135
-
136
-
137
-
138
-
139
-
140
-
141
-
142
-
143
-
144
-
145
-
146
-
147
-
148
-
149
-
150
-
151
-
152
-
153
-
154
-
155
-
156
-
157
-
158
-
159
-
160
-
161
-
162
-
163
-
164
-
165
-
166
-
167
-
168
-
169
-
170
-
171
-
172
-
173
-
174
-
175
-
176
-
177
-
178
-
179
-
180
-
181
-
182
-
183
-
184
-
185
-
186
-
187
-
188
-
189
-
190
-
191
-
192
-
193
-
194
-
195
-
196
-
197
-
198
-
199
-
200
-
201
-
202
-
203
 |
 |
