HP Latex 560 User Guide - Page 154
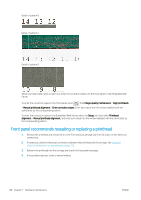
Front panel recommends reseating or replacing a printhead, the corresponding pattern.
 |
View all HP Latex 560 manuals
Add to My Manuals
Save this manual to your list of manuals |
Page 154 highlights
Detail of pattern B Detail of pattern C Detail of pattern D When you have made notes on each row, enter the correction values into the front panel or the Embedded Web Server. To enter the correction values in the front panel, press , then Image-quality maintenance > Align printheads > Manual printhead alignment > Enter correction values. Enter each value into the window labelled with the same letter as the corresponding pattern. To enter the correction values in the Embedded Web Server, select the Setup tab, then select Printhead alignment > Manual printhead alignment, and enter each value into the window labelled with the same letter as the corresponding pattern. Front panel recommends reseating or replacing a printhead 1. Remove the printhead and check that it is free from physical damage and from ink stains on the electrical connections. 2. If necessary, clean the electrical connections between the printhead and the carriage. See Clean the electrical connections on a printhead on page 155. 3. Reinsert the printhead into the carriage and check the front panel message. 4. If the problem persists, insert a new printhead. 148 Chapter 7 Hardware maintenance ENWW
-
 1
1 -
2
-
3
-
4
-
5
-
6
-
7
-
8
-
9
-
10
-
11
-
12
-
13
-
14
-
15
-
16
-
17
-
18
-
19
-
20
-
21
-
22
-
23
-
24
-
25
-
26
-
27
-
28
-
29
-
30
-
31
-
32
-
33
-
34
-
35
-
36
-
37
-
38
-
39
-
40
-
41
-
42
-
43
-
44
-
45
-
46
-
47
-
48
-
49
-
50
-
51
-
52
-
53
-
54
-
55
-
56
-
57
-
58
-
59
-
60
-
61
-
62
-
63
-
64
-
65
-
66
-
67
-
68
-
69
-
70
-
71
-
72
-
73
-
74
-
75
-
76
-
77
-
78
-
79
-
80
-
81
-
82
-
83
-
84
-
85
-
86
-
87
-
88
-
89
-
90
-
91
-
92
-
93
-
94
-
95
-
96
-
97
-
98
-
99
-
100
-
101
-
102
-
103
-
104
-
105
-
106
-
107
-
108
-
109
-
110
-
111
-
112
-
113
-
114
-
115
-
116
-
117
-
118
-
119
-
120
-
121
-
122
-
123
-
124
-
125
-
126
-
127
-
128
-
129
-
130
-
131
-
132
-
133
-
134
-
135
-
136
-
137
-
138
-
139
-
140
-
141
-
142
-
143
-
144
-
145
-
146
-
147
-
148
-
 149
149 -
 150
150 -
 151
151 -
 152
152 -
 153
153 -
 154
154 -
 155
155 -
 156
156 -
 157
157 -
 158
158 -
 159
159 -
160
-
161
-
162
-
163
-
164
-
165
-
166
-
167
-
168
-
169
-
170
-
171
-
172
-
173
-
174
-
175
-
176
-
177
-
178
-
179
-
180
-
181
-
182
-
183
-
184
-
185
-
186
-
187
-
188
-
189
-
190
-
191
-
192
-
193
-
194
-
195
-
196
-
197
-
198
-
199
-
200
-
201
-
202
-
203
 |
 |
