HP Latex 560 User Guide - Page 79
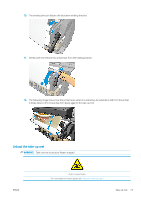
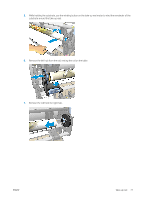
Tape the leading edge of the substrate to the core in the center
 |
View all HP Latex 560 manuals
Add to My Manuals
Save this manual to your list of manuals |
Page 79 highlights
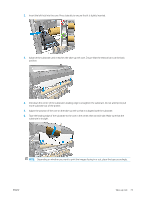
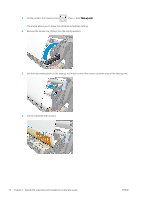
2. Insert the left hub into the core. Press laterally to ensure that it is tightly inserted. 3. Advance the substrate until it reaches the take-up reel core. Ensure that the tension bar is at the back position. 4. Pull down the center of the substrate's leading edge to straighten the substrate. Do not attempt to pull more substrate out of the printer. 5. Adjust the position of the core on the take-up reel so that it is aligned with the substrate. 6. Tape the leading edge of the substrate to the core in the center, then at each side. Make sure that the substrate is straight. NOTE: Depending on whether you want to print the images facing in or out, place the tape accordingly. ENWW Take-up reel 73
-
 1
1 -
2
-
3
-
4
-
5
-
6
-
7
-
8
-
9
-
10
-
11
-
12
-
13
-
14
-
15
-
16
-
17
-
18
-
19
-
20
-
21
-
22
-
23
-
24
-
25
-
26
-
27
-
28
-
29
-
30
-
31
-
32
-
33
-
34
-
35
-
36
-
37
-
38
-
39
-
40
-
41
-
42
-
43
-
44
-
45
-
46
-
47
-
48
-
49
-
50
-
51
-
52
-
53
-
54
-
55
-
56
-
57
-
58
-
59
-
60
-
61
-
62
-
63
-
64
-
65
-
66
-
67
-
68
-
69
-
70
-
71
-
72
-
73
-
 74
74 -
 75
75 -
 76
76 -
 77
77 -
 78
78 -
 79
79 -
 80
80 -
 81
81 -
 82
82 -
 83
83 -
 84
84 -
85
-
86
-
87
-
88
-
89
-
90
-
91
-
92
-
93
-
94
-
95
-
96
-
97
-
98
-
99
-
100
-
101
-
102
-
103
-
104
-
105
-
106
-
107
-
108
-
109
-
110
-
111
-
112
-
113
-
114
-
115
-
116
-
117
-
118
-
119
-
120
-
121
-
122
-
123
-
124
-
125
-
126
-
127
-
128
-
129
-
130
-
131
-
132
-
133
-
134
-
135
-
136
-
137
-
138
-
139
-
140
-
141
-
142
-
143
-
144
-
145
-
146
-
147
-
148
-
149
-
150
-
151
-
152
-
153
-
154
-
155
-
156
-
157
-
158
-
159
-
160
-
161
-
162
-
163
-
164
-
165
-
166
-
167
-
168
-
169
-
170
-
171
-
172
-
173
-
174
-
175
-
176
-
177
-
178
-
179
-
180
-
181
-
182
-
183
-
184
-
185
-
186
-
187
-
188
-
189
-
190
-
191
-
192
-
193
-
194
-
195
-
196
-
197
-
198
-
199
-
200
-
201
-
202
-
203
 |
 |

2.
Insert the left hub into the core. Press laterally to ensure that it is tightly inserted.
3.
Advance the substrate until it reaches the take-up reel core. Ensure that the tension bar is at the back
position.
4.
Pull down the center of the substrate's leading edge to straighten the substrate. Do not attempt to pull
more substrate out of the printer.
5.
Adjust the position of the core on the take-up reel so that it is aligned with the substrate.
6.
Tape the leading edge of the substrate to the core in the center, then at each side. Make sure that the
substrate is straight.
NOTE:
Depending on whether you want to print the images facing in or out, place the tape accordingly.
ENWW
Take-up reel
73