HP Latex 560 User Guide - Page 85
Double-sided printing, Replacement, Outline, Double-sided printing in detail
 |
View all HP Latex 560 manuals
Add to My Manuals
Save this manual to your list of manuals |
Page 85 highlights
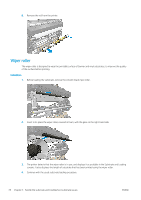
Tips ● After loading, the first 300 mm of substrate between the wiper roller and the print zone has not been wiped. You can add that distance as a top margin in your RIP, or you can move the substrate back and forth from the Substrate menu to wipe that area before printing. ● To obtain the most benefit from the wiper roller, ensure that the pivot table is in the inner position, so that the substrate has maximum contact with the wiper roller. ● For some vinyl substrates, you can optimize performance by increasing the input tension to 30 N·m in your substrate preset. See Modify a substrate preset on page 95. ● If the wiping is not effective enough, consider either using a slower print mode or adding delays between passes in the substrate presets to allow more passes of the roller per substrate advance. Replacement ● ● ● The wiper roller foam does not last indefinitely and should be replaced after extended use. The printer tracks the length of substrate wiped by the roller, and displays a warning when replacement is due. Extract the right end cap with the gear from the old roller, and insert the gear into the replacement unit. Then reset the Replace wiper roller counter in the printer's front panel. Double-sided printing The printer can be used to print on both sides of the substrate, in the following way. NOTE: The print should be at least 28 cm (11 in) wide, otherwise the printer will not be able to find the reference line when printing the second side. Outline 1. Tell the printer or the RIP that you intend to print on both sides. Double-sided printing can be selected in your RIP software or at the printer's front panel. The RIP setting takes precedence: if double-sided printing is explicitly turned on or off in the RIP software, the front panel setting is ignored. 2. The printer prints the content that you want to appear on the first side. After each job, the printer prints a black reference line that is used to align the matching job on the second side. 3. After all side A jobs have been printed, cut and unload the substrate. 4. Reload the cut substrate upside down and starting at the end. The reference line marking the end of the first side should be face down and near the leading edge. 5. The printer finds the reference line, and uses it to start printing the second side in the right place. NOTE: If you try to move the substrate while printing on either side, the front panel asks for confirmation, because any such movement prevents correct alignment between the two sides. Double-sided printing in detail 1. Load the substrate in the normal way for the substrate you are using. 2. Optionally, select the side to print in the Double Side menu on the Load Configuration screen. If the RIP supports double-sided printing, select double-sided printing in your RIP software. NOTE: The automatic cutter and the extra top/bottom margin are both disabled during double-sided printing. ENWW Double-sided printing 79
-
 1
1 -
2
-
3
-
4
-
5
-
6
-
7
-
8
-
9
-
10
-
11
-
12
-
13
-
14
-
15
-
16
-
17
-
18
-
19
-
20
-
21
-
22
-
23
-
24
-
25
-
26
-
27
-
28
-
29
-
30
-
31
-
32
-
33
-
34
-
35
-
36
-
37
-
38
-
39
-
40
-
41
-
42
-
43
-
44
-
45
-
46
-
47
-
48
-
49
-
50
-
51
-
52
-
53
-
54
-
55
-
56
-
57
-
58
-
59
-
60
-
61
-
62
-
63
-
64
-
65
-
66
-
67
-
68
-
69
-
70
-
71
-
72
-
73
-
74
-
75
-
76
-
77
-
78
-
79
-
 80
80 -
 81
81 -
 82
82 -
 83
83 -
 84
84 -
 85
85 -
 86
86 -
 87
87 -
 88
88 -
 89
89 -
 90
90 -
91
-
92
-
93
-
94
-
95
-
96
-
97
-
98
-
99
-
100
-
101
-
102
-
103
-
104
-
105
-
106
-
107
-
108
-
109
-
110
-
111
-
112
-
113
-
114
-
115
-
116
-
117
-
118
-
119
-
120
-
121
-
122
-
123
-
124
-
125
-
126
-
127
-
128
-
129
-
130
-
131
-
132
-
133
-
134
-
135
-
136
-
137
-
138
-
139
-
140
-
141
-
142
-
143
-
144
-
145
-
146
-
147
-
148
-
149
-
150
-
151
-
152
-
153
-
154
-
155
-
156
-
157
-
158
-
159
-
160
-
161
-
162
-
163
-
164
-
165
-
166
-
167
-
168
-
169
-
170
-
171
-
172
-
173
-
174
-
175
-
176
-
177
-
178
-
179
-
180
-
181
-
182
-
183
-
184
-
185
-
186
-
187
-
188
-
189
-
190
-
191
-
192
-
193
-
194
-
195
-
196
-
197
-
198
-
199
-
200
-
201
-
202
-
203
 |
 |
