HP OfficeJet Pro 8120 User Guide - Page 69
Utilities, Settings, Fax Receive, Fax Receive Settings, Auto Answer
 |
View all HP OfficeJet Pro 8120 manuals
Add to My Manuals
Save this manual to your list of manuals |
Page 69 highlights
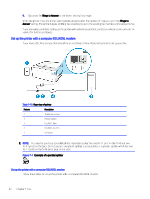
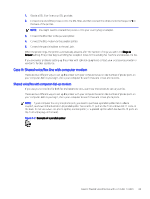
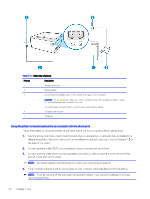
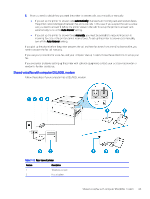
Table 7-9 Rear view of printer Feature Description 1 Telephone wall jack. 2 Use a minimum 26 AWG phone cord to connect to the port on the printer. CAUTION: To reduce the risk of fire, use only No. 26 AWG or larger (For example, 24 AWG) UL Listed or CSA Certified Telecommunications Line Cord. You might need to connect the phone cord to your country/region adapter. 3 Computer with modem. Set up the printer with a computer dial-up modem Follow these steps to set up the printer with a computer dial-up modem. 1. Find the phone cord that connects from the back of your computer (your computer dial-up modem) to a telephone wall jack. Disconnect the cord from the telephone wall jack and plug it into the Fax port on the back of the printer. 2. Connect one end of the phone cord to your telephone wall jack, then connect the other end to the Fax port on the back of the printer. NOTE: You might need to connect the phone cord to your country/region adapter. 3. If your modem software is set to receive faxes to your computer automatically, turn off that setting. NOTE: If you do not turn off the automatic fax reception setting in your modem software, the printer cannot receive faxes. 4. On the control panel Home screen, touch Menu. 5. Scroll to Utilities and touch Settings. 6. Touch Fax Receive, and then touch Fax Receive Settings. 7. Turn on Auto Answer. Set up the printer with a computer dial-up modem 61
-
 1
1 -
2
-
3
-
4
-
5
-
6
-
7
-
8
-
9
-
10
-
11
-
12
-
13
-
14
-
15
-
16
-
17
-
18
-
19
-
20
-
21
-
22
-
23
-
24
-
25
-
26
-
27
-
28
-
29
-
30
-
31
-
32
-
33
-
34
-
35
-
36
-
37
-
38
-
39
-
40
-
41
-
42
-
43
-
44
-
45
-
46
-
47
-
48
-
49
-
50
-
51
-
52
-
53
-
54
-
55
-
56
-
57
-
58
-
59
-
60
-
61
-
62
-
63
-
 64
64 -
 65
65 -
 66
66 -
 67
67 -
 68
68 -
 69
69 -
 70
70 -
 71
71 -
 72
72 -
 73
73 -
 74
74 -
75
-
76
-
77
-
78
-
79
-
80
-
81
-
82
-
83
-
84
-
85
-
86
-
87
-
88
-
89
-
90
-
91
-
92
-
93
-
94
-
95
-
96
-
97
-
98
-
99
-
100
-
101
-
102
-
103
-
104
-
105
-
106
-
107
-
108
-
109
-
110
-
111
-
112
-
113
-
114
-
115
-
116
-
117
-
118
-
119
-
120
-
121
-
122
-
123
-
124
-
125
-
126
-
127
-
128
-
129
-
130
-
131
-
132
-
133
-
134
-
135
-
136
 |
 |
