HP XM600 hp kayak xm600 series 2, user's guide for desktop models - Page 25
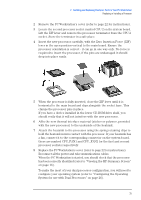
these are marked CPU_FAN1 and CPU_FAN2 for the first and second, processor sockets respectively.
 |
View all HP XM600 manuals
Add to My Manuals
Save this manual to your list of manuals |
Page 25 highlights
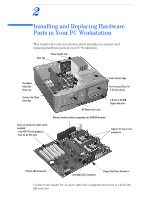
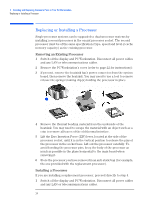
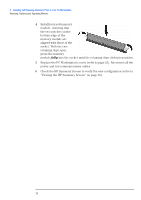
2 Installing and Replacing Hardware Parts in Your PC Workstation Replacing or Installing a Processor 2 Remove the PC Workstation's cover (refer to page 22 for instructions). 3 Locate the second processor socket marked CPU 2 on the system board. Lift the ZIF lever and remove the processor terminator from the CPU 2 socket. Store the terminator in a safe place. 4 Insert the new processor carefully, with the Zero Insertion Force (ZIF) lever in the open position vertical to the main board. Ensure the processor orientation is correct - it can go in one way only. No force is required to insert the processor, if the pins are undamaged it should drop into place easily. … ‡ ˆ † 5 When the processor is fully inserted, close the ZIF lever until it is horizontal to the main board and clips alongside the socket base. This clamps the processor pins in place. If you have a device installed in the lower CD-ROM drive shelf, you should verify that it will not interfere with the new processor. 6 Affix the new thermal interface material (sticker or polymer, provided with the new processor) to the underside of the heatsink. 7 Attach the heatsink to the processor using the spring retaining clips to hold the heatsink in firm contact with the processor. If your heatsink has a fan, connect it to the corresponding connector on the system board, these are marked CPU_FAN1 and CPU_FAN2 for the first and second processor sockets respectively. 8 Replace the PC Workstation's cover (refer to page 22 for instructions). Reconnect all the power and telecommunications cables. When the PC Workstation is started, you should check that the processor has been correctly identified (refer to "Viewing the HP Summary Screen" on page 16). To make the most of your dual processor configuration, you will need to configure your operating system (refer to "Configuring the Operating System for use with Dual Processors" on page 26). 25
-
 1
1 -
2
-
3
-
4
-
5
-
6
-
7
-
8
-
9
-
10
-
11
-
12
-
13
-
14
-
15
-
16
-
17
-
18
-
19
-
 20
20 -
 21
21 -
 22
22 -
 23
23 -
 24
24 -
 25
25 -
 26
26 -
 27
27 -
 28
28 -
 29
29 -
 30
30 -
31
-
32
-
33
-
34
-
35
-
36
-
37
-
38
-
39
-
40
-
41
-
42
-
43
-
44
-
45
-
46
-
47
-
48
-
49
-
50
-
51
-
52
-
53
-
54
-
55
-
56
-
57
-
58
-
59
-
60
-
61
-
62
-
63
 |
 |
