HP XM600 hp kayak xm600 series 2, user's guide for desktop models - Page 36
Installing a Device in a Front Access Bay, Removing the Front Access Drive Cage, Installing the Device
 |
View all HP XM600 manuals
Add to My Manuals
Save this manual to your list of manuals |
Page 36 highlights
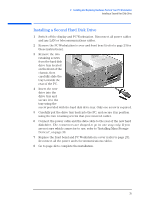
2 Installing and Replacing Hardware Parts in Your PC Workstation Installing a Device in a Front Access Bay Installing a Device in a Front Access Bay NOTE If the PC has two processors installed, you may not be able to install some 5.25-inch devices (such as a CD-R/W drive) in the lower front shelf. If this is the case, install the longer of the two 5.25-inch devices in the top shelf. Removing the Front Access Drive Cage 1 Switch off the display and PC Workstation. Disconnect all power cables and any LAN or telecommunications cables. 2 Remove the PC Workstation's cover and the front bezel (refer to page 22 for instructions). 3 Remove the retaining screw from the front access cage, and slide it forwards until it stops. 4 Disconnect the power and data cables from the installed drives. 5 Lift the front access cage upwards and out from the PC. Place the cage on a table/desk top. Installing the Device 1 Remove the 5.25-inch plastic filler plate. Use a screwdriver to unclip the two latches located on the left-hand side of the filler plate, then pivot it out. Store the filler plate in a safe place for future use. Take care not to hurt your fingers when you remove the plate. 2 If the new device has a tray, attach it to the front access cage. Some devices may require an HP-supplied tray before they can be installed. The tray is available as an accessory. CD-ROM drives do not require a tray. 36
-
 1
1 -
2
-
3
-
4
-
5
-
6
-
7
-
8
-
9
-
10
-
11
-
12
-
13
-
14
-
15
-
16
-
17
-
18
-
19
-
20
-
21
-
22
-
23
-
24
-
25
-
26
-
27
-
28
-
29
-
30
-
 31
31 -
 32
32 -
 33
33 -
 34
34 -
 35
35 -
 36
36 -
 37
37 -
 38
38 -
 39
39 -
 40
40 -
 41
41 -
42
-
43
-
44
-
45
-
46
-
47
-
48
-
49
-
50
-
51
-
52
-
53
-
54
-
55
-
56
-
57
-
58
-
59
-
60
-
61
-
62
-
63
 |
 |
