HP XM600 hp kayak xm600 series 2, user's guide for desktop models - Page 35
Installing a Second Hard Disk Drive, Carefully put the drive tray back into the PC
 |
View all HP XM600 manuals
Add to My Manuals
Save this manual to your list of manuals |
Page 35 highlights
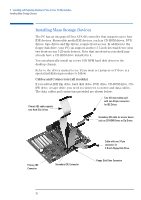
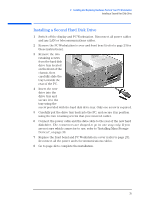
2 Installing and Replacing Hardware Parts in Your PC Workstation Installing a Second Hard Disk Drive Installing a Second Hard Disk Drive 1 Switch off the display and PC Workstation. Disconnect all power cables and any LAN or telecommunications cables. 2 Remove the PC Workstation's cover and front bezel (refer to page 23 for these instructions). 3 Remove the two retaining screws from the hard disk drive tray located on the front of the chassis, then carefully slide the tray towards the rear of the PC. 4 Insert the new drive into the drive tray and secure it to the tray using the screw provided with the hard disk drive tray. Only one screw is required. 5 Carefully put the drive tray back into the PC, and secure it in position using the two retaining screws that you removed earlier. 6 Connect the power cable and the data cable to the rear of the new hard disk drive. The connectors are shaped to go in one way only. If you are not sure which connector to use, refer to "Installing Mass Storage Devices", on page 30. 7 Replace the front bezel and PC Workstation's cover (refer to page 23). Reconnect all the power and telecommunications cables. 8 Go to page 42 to complete the installation. 35
-
 1
1 -
2
-
3
-
4
-
5
-
6
-
7
-
8
-
9
-
10
-
11
-
12
-
13
-
14
-
15
-
16
-
17
-
18
-
19
-
20
-
21
-
22
-
23
-
24
-
25
-
26
-
27
-
28
-
29
-
 30
30 -
 31
31 -
 32
32 -
 33
33 -
 34
34 -
 35
35 -
 36
36 -
 37
37 -
 38
38 -
 39
39 -
 40
40 -
41
-
42
-
43
-
44
-
45
-
46
-
47
-
48
-
49
-
50
-
51
-
52
-
53
-
54
-
55
-
56
-
57
-
58
-
59
-
60
-
61
-
62
-
63
 |
 |
