HP XM600 hp kayak xm600 series 2, user's guide for desktop models - Page 34
Removing and Replacing the Primary Hard Disk Drive, Removing the Existing Drive
 |
View all HP XM600 manuals
Add to My Manuals
Save this manual to your list of manuals |
Page 34 highlights
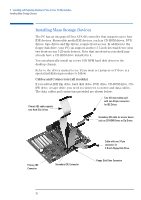
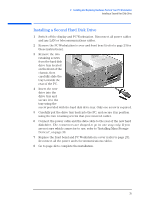
2 Installing and Replacing Hardware Parts in Your PC Workstation Removing and Replacing the Primary Hard Disk Drive CAUTION CAUTION Removing and Replacing the Primary Hard Disk Drive Handle the hard disk drive with care. Avoid shocks and violent movement as this can cause damage to the hard disk drive's internal components. Make sure that you back up your files before you install a hard disk drive. Refer to your operating system documentation for information on how to do this. Removing the Existing Drive 1 Switch off the display and PC Workstation. Disconnect all power cables and any LAN or telecommunications cables. 2 Remove the PC Workstation's cover and front bezel (refer to page 23). 3 Remove the two retaining screws from the chassis located on the front of the PC and pull the primary hard disk drive out of the hard disk drive bay. 4 Disconnect the data and power cables from the hard disk drive. Take care when handling the hard disk drive during installation. A onequarter inch drop can damage it. Installing the New Drive 1 Connect the data and power connectors to the hard disk drive. 2 Slide the new drive into the hard disk drive bay (with the correct orientation) and tighten the two retaining screws you removed earlier. 3 Replace the front bezel and PC Workstation's cover (refer to page 23). Reconnect all the power and telecommunications cables. 4 Go to page 42 to complete the installation. 34
-
 1
1 -
2
-
3
-
4
-
5
-
6
-
7
-
8
-
9
-
10
-
11
-
12
-
13
-
14
-
15
-
16
-
17
-
18
-
19
-
20
-
21
-
22
-
23
-
24
-
25
-
26
-
27
-
28
-
 29
29 -
 30
30 -
 31
31 -
 32
32 -
 33
33 -
 34
34 -
 35
35 -
 36
36 -
 37
37 -
 38
38 -
 39
39 -
40
-
41
-
42
-
43
-
44
-
45
-
46
-
47
-
48
-
49
-
50
-
51
-
52
-
53
-
54
-
55
-
56
-
57
-
58
-
59
-
60
-
61
-
62
-
63
 |
 |
