HP Xw9300 HP xw9300 Service and Technical Reference Guide - Page 140
Diagnostic Light Codes, blinking lights and beeps repeat for five cycles. After - beep codes
 |
View all HP Xw9300 manuals
Add to My Manuals
Save this manual to your list of manuals |
Page 140 highlights
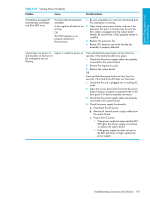
Diagnostic Light Codes This sections provides an overview of the diagnostic lights that are related to your workstation. NOTE: The beeps are heard through the on-board piezo speaker and not the chassis speaker. The blinking lights and beeps repeat for five cycles. After that, only the blinking lights repeat. Table 5-22 Diagnostic Light Codes Chassis Indicator Lights Power LED and Sound Activity Diagnosis and Service Action None System does not power on. Press the power button. If the HDD LED is green: 1. Check that the power supply cables are properly connected to the system board. 2. Remove the expansion cards one at a time. 3. Replace the system board. Or Press the power button. If the HDD LED does not illuminate: 1. Check that the unit is plugged into a working AC outlet. 2. Check that the power button harness is properly connected to the in-line front panel I/O device assembly connector. 3. Check that the power supply cables are properly connected to the system board. 4. Check the power supply functionality. a. Disconnect the AC power. b. Remove all internal power supply cables from the system board. c. Plug in the AC power. • If the power supply fan spins and the BIST LED lights, the power supply is functional. Replace the system board. • If the power supply fan does not spin or the BIST LED does not light, replace the power supply. Beeps and blinks RED two times Thermal shutdown: 1. Ensure the workstation air vents are not blocked and the cooling fans are running. 2. Press the power button, and see if the fans on the CPU heatsinks spin. If they are not spinning, ensure the fan cable is plugged into the system board. Ensure the CPU heatsinks are properly seated. 3. If the CPU heatsinks are plugged in and seated but are not spinning, replace the CPU heatsinks. 4. Reseat the CPU heatsinks and verify the fan assemblies are properly attached. Beeps and blinks RED 3 times CPU is not installed: 1. Install CPU. 2. Reseat CPU. 140 System Diagnostics and Troubleshooting
-
 1
1 -
2
-
3
-
4
-
5
-
6
-
7
-
8
-
9
-
10
-
11
-
12
-
13
-
14
-
15
-
16
-
17
-
18
-
19
-
20
-
21
-
22
-
23
-
24
-
25
-
26
-
27
-
28
-
29
-
30
-
31
-
32
-
33
-
34
-
35
-
36
-
37
-
38
-
39
-
40
-
41
-
42
-
43
-
44
-
45
-
46
-
47
-
48
-
49
-
50
-
51
-
52
-
53
-
54
-
55
-
56
-
57
-
58
-
59
-
60
-
61
-
62
-
63
-
64
-
65
-
66
-
67
-
68
-
69
-
70
-
71
-
72
-
73
-
74
-
75
-
76
-
77
-
78
-
79
-
80
-
81
-
82
-
83
-
84
-
85
-
86
-
87
-
88
-
89
-
90
-
91
-
92
-
93
-
94
-
95
-
96
-
97
-
98
-
99
-
100
-
101
-
102
-
103
-
104
-
105
-
106
-
107
-
108
-
109
-
110
-
111
-
112
-
113
-
114
-
115
-
116
-
117
-
118
-
119
-
120
-
121
-
122
-
123
-
124
-
125
-
126
-
127
-
128
-
129
-
130
-
131
-
132
-
133
-
134
-
 135
135 -
 136
136 -
 137
137 -
 138
138 -
 139
139 -
 140
140 -
 141
141 -
 142
142 -
 143
143 -
 144
144 -
 145
145 -
146
-
147
-
148
-
149
-
150
-
151
-
152
-
153
-
154
-
155
-
156
-
157
-
158
-
159
-
160
-
161
-
162
-
163
-
164
-
165
-
166
-
167
-
168
-
169
-
170
-
171
-
172
-
173
-
174
-
175
-
176
-
177
-
178
-
179
-
180
-
181
-
182
-
183
-
184
-
185
-
186
-
187
-
188
-
189
-
190
-
191
-
192
-
193
-
194
-
195
-
196
-
197
-
198
-
199
-
200
-
201
-
202
-
203
-
204
-
205
-
206
-
207
-
208
-
209
-
210
-
211
-
212
-
213
-
214
-
215
-
216
-
217
-
218
-
219
-
220
-
221
-
222
-
223
-
224
-
225
-
226
-
227
-
228
-
229
-
230
 |
 |
