HP dx7200 HP Compaq Business PC dx7200 MT Service Reference Guide, 1st edition - Page 129
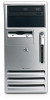
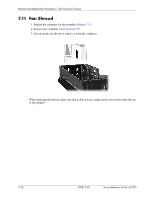
To replace the drive, reverse the removal procedure making sure you rotate the rear of the drive, down
 |
View all HP dx7200 manuals
Add to My Manuals
Save this manual to your list of manuals |
Page 129 highlights
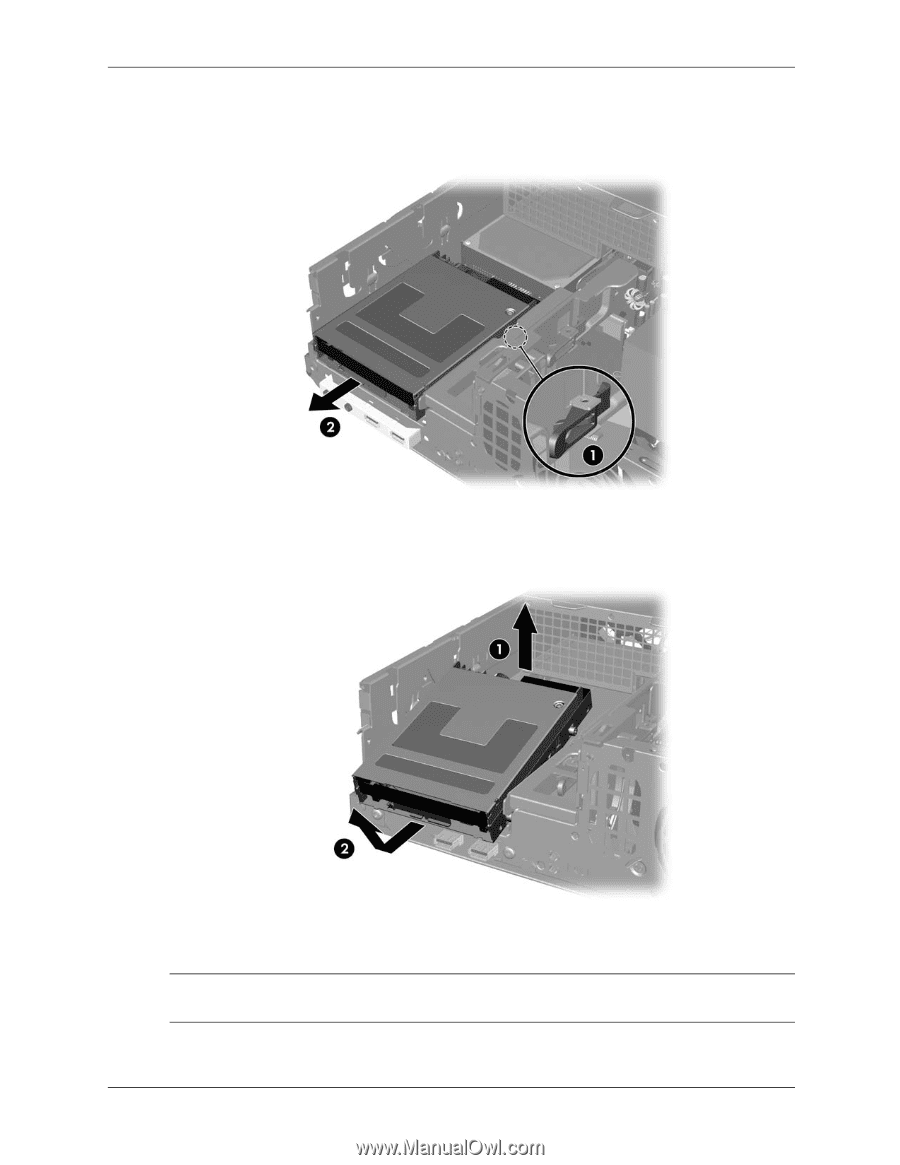
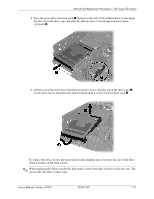
Removal and Replacement Procedures- Slim Tower (ST) Chassis 8. Press the green drive retention latch 1 located on the side of the diskette drive to disengage the drive from the drive cage and slide the diskette drive forward approximately 6mm (1/4 inch) 2. 9. Lift the rear of the drive up so that the rear guide screws clear the top of the drive cage 1. As the drive rises it automatically slides forward until it is free from the drive cage 2. To replace the drive, reverse the removal procedure making sure you rotate the rear of the drive down, pivoting on the front screws. ✎ When replacing the drive, transfer the four metric screws from the old drive to the new one. The screws take the place of drive rails. Service Reference Guide, dx7200 390812-001 7-21
-
 1
1 -
2
-
3
-
4
-
5
-
6
-
7
-
8
-
9
-
10
-
11
-
12
-
13
-
14
-
15
-
16
-
17
-
18
-
19
-
20
-
21
-
22
-
23
-
24
-
25
-
26
-
27
-
28
-
29
-
30
-
31
-
32
-
33
-
34
-
35
-
36
-
37
-
38
-
39
-
40
-
41
-
42
-
43
-
44
-
45
-
46
-
47
-
48
-
49
-
50
-
51
-
52
-
53
-
54
-
55
-
56
-
57
-
58
-
59
-
60
-
61
-
62
-
63
-
64
-
65
-
66
-
67
-
68
-
69
-
70
-
71
-
72
-
73
-
74
-
75
-
76
-
77
-
78
-
79
-
80
-
81
-
82
-
83
-
84
-
85
-
86
-
87
-
88
-
89
-
90
-
91
-
92
-
93
-
94
-
95
-
96
-
97
-
98
-
99
-
100
-
101
-
102
-
103
-
104
-
105
-
106
-
107
-
108
-
109
-
110
-
111
-
112
-
113
-
114
-
115
-
116
-
117
-
118
-
119
-
120
-
121
-
122
-
123
-
 124
124 -
 125
125 -
 126
126 -
 127
127 -
 128
128 -
 129
129 -
 130
130 -
 131
131 -
 132
132 -
 133
133 -
 134
134 -
135
-
136
-
137
-
138
-
139
-
140
-
141
-
142
-
143
-
144
-
145
-
146
-
147
-
148
-
149
-
150
-
151
-
152
-
153
-
154
-
155
-
156
-
157
-
158
-
159
-
160
-
161
-
162
-
163
-
164
-
165
-
166
-
167
-
168
-
169
-
170
-
171
-
172
-
173
-
174
-
175
-
176
-
177
-
178
-
179
-
180
-
181
-
182
-
183
-
184
-
185
-
186
-
187
-
188
-
189
-
190
-
191
-
192
-
193
-
194
-
195
-
196
-
197
-
198
-
199
-
200
-
201
-
202
-
203
-
204
-
205
-
206
-
207
-
208
-
209
-
210
-
211
-
212
-
213
-
214
-
215
-
216
 |
 |