IBM RS6000 Service Guide - Page 25
Typical Boot Sequence for RS/6000 7025 F50 Series - support
 |
View all IBM RS6000 manuals
Add to My Manuals
Save this manual to your list of manuals |
Page 25 highlights
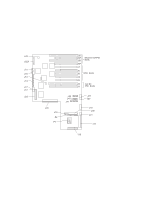
Typical Boot Sequence for RS/6000 7025 F50 Series After the A/C power is turned on, the System Support Controller (SSC) startup begins, and releases reset to the Service Processor. If the SSC cannot communicate with the Service Processor, the LCD displays 4BA00000. If the Service Processor is not present, the LCD displays 4BA00001. 1. Service Processor Self Test Service Processor card performs self test and NVRAM initialization. LCD Code range is E000 - E07F. LCD code is "OK" when complete. 2. Service Processor in Standby Mode You can enter the Service Processor menus whenever the LCD code is "OK", "STBY", or has an eight digit error code on the LCD display by pressing the enter key on an ASCII terminal connected to serial port 1. 3. Built-In-Self-Test (BIST) The Service Processor initiates Built-In-Self-Test (BIST) on the Central Electronics Complex (CEC) chips when the POWER Button is pressed. The VPD data is read and the CRC is checked. The CPU compatibility test is run. LCD Code range is E0A0 - E0E1. 4. System Initialization System firmware begins to execute and initializes system registers after LCD code E0E1. LCD Code range is E1XX - E2XX. 5. Memory Test The system firmware tests the system memory and identifies failing memory cards and memory module locations. LCD Code range is E3XX. 6. Device Configuration and Test System firmware checks to see what devices are in the system and performs a simple test on them. The system firmware displays the device name or device icon being tested. After the keyboard name or icon appears, the user can enter the Systems Management Services menu by hitting the "1" key (if ASCII terminal) or the "F1" key (if Graphics terminal). The user can also enter one of the following: - "5" or "F5" to start the Stand-alone Diagnostics (CD or Tape). - "6" or "F6" to start the On-line Diagnostics (Hard Disk) Chapter 1. Reference Information 1-9
-
 1
1 -
2
-
3
-
4
-
5
-
6
-
7
-
8
-
9
-
10
-
11
-
12
-
13
-
14
-
15
-
16
-
17
-
18
-
19
-
 20
20 -
 21
21 -
 22
22 -
 23
23 -
 24
24 -
 25
25 -
 26
26 -
 27
27 -
 28
28 -
 29
29 -
 30
30 -
31
-
32
-
33
-
34
-
35
-
36
-
37
-
38
-
39
-
40
-
41
-
42
-
43
-
44
-
45
-
46
-
47
-
48
-
49
-
50
-
51
-
52
-
53
-
54
-
55
-
56
-
57
-
58
-
59
-
60
-
61
-
62
-
63
-
64
-
65
-
66
-
67
-
68
-
69
-
70
-
71
-
72
-
73
-
74
-
75
-
76
-
77
-
78
-
79
-
80
-
81
-
82
-
83
-
84
-
85
-
86
-
87
-
88
-
89
-
90
-
91
-
92
-
93
-
94
-
95
-
96
-
97
-
98
-
99
-
100
-
101
-
102
-
103
-
104
-
105
-
106
-
107
-
108
-
109
-
110
-
111
-
112
-
113
-
114
-
115
-
116
-
117
-
118
-
119
-
120
-
121
-
122
-
123
-
124
-
125
-
126
-
127
-
128
-
129
-
130
-
131
-
132
-
133
-
134
-
135
-
136
-
137
-
138
-
139
-
140
-
141
-
142
-
143
-
144
-
145
-
146
-
147
-
148
-
149
-
150
-
151
-
152
-
153
-
154
-
155
-
156
-
157
-
158
-
159
-
160
-
161
-
162
-
163
-
164
-
165
-
166
-
167
-
168
-
169
-
170
-
171
-
172
-
173
-
174
-
175
-
176
-
177
-
178
-
179
-
180
-
181
-
182
-
183
-
184
-
185
-
186
-
187
-
188
-
189
-
190
-
191
-
192
-
193
-
194
-
195
-
196
-
197
-
198
-
199
-
200
-
201
-
202
-
203
-
204
-
205
-
206
-
207
-
208
-
209
-
210
-
211
-
212
-
213
-
214
-
215
-
216
-
217
-
218
-
219
-
220
-
221
-
222
-
223
-
224
-
225
-
226
-
227
-
228
-
229
-
230
-
231
-
232
-
233
-
234
-
235
-
236
-
237
-
238
-
239
-
240
-
241
-
242
-
243
-
244
-
245
-
246
-
247
-
248
-
249
-
250
-
251
-
252
-
253
-
254
-
255
-
256
-
257
-
258
-
259
-
260
-
261
-
262
-
263
-
264
-
265
-
266
-
267
-
268
-
269
-
270
-
271
-
272
-
273
-
274
-
275
-
276
-
277
-
278
-
279
-
280
-
281
-
282
-
283
-
284
-
285
-
286
-
287
-
288
-
289
-
290
-
291
-
292
-
293
-
294
-
295
-
296
-
297
-
298
-
299
-
300
-
301
-
302
-
303
-
304
-
305
-
306
-
307
-
308
-
309
-
310
-
311
-
312
-
313
-
314
-
315
-
316
-
317
-
318
-
319
-
320
-
321
-
322
-
323
-
324
-
325
-
326
-
327
-
328
-
329
-
330
-
331
-
332
-
333
-
334
-
335
-
336
-
337
-
338
-
339
-
340
-
341
-
342
-
343
-
344
-
345
-
346
-
347
-
348
-
349
-
350
-
351
-
352
-
353
-
354
-
355
-
356
-
357
-
358
 |
 |