Intel SS4000-E User Guide - Page 141
Restore Disk, Restore, Start Intel
 |
UPC - 735858182652
View all Intel SS4000-E manuals
Add to My Manuals
Save this manual to your list of manuals |
Page 141 highlights
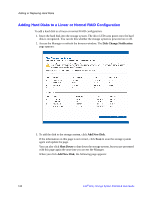
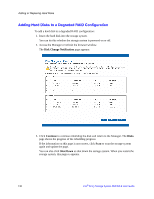
12. Click Restore Disk. The Restore dialog box displays. Protecting Local Disks 13. Specify whether you are recovering to the original disk or a new disk. If you are recovering to a new disk, select the desired disk from the list and then click Restore. 14. When the confirmation message displays, click Yes. The backup is recovered to your local disk, and the progress bar displays the progress of this process. You can cancel the recovery at any time by clicking Stop on the progress dialog box. Note: Do not shut down your computer, disconnect from the network, or perform any other tasks until this process is complete. 15. After the recovery is complete, click OK to restart your computer. 16. Use the appropriate procedure for your computer to configure it to boot from the local disk once more. 17. If you changed the recovery password, reset it in the Microsoft iSCSI Initiator* after your computer restarts as described in "Resetting the Recovery Password in the Microsoft iSCSI Initiator*" on page 166. 18. Start Intel® Client Backup and Recovery and remove protection from all your disks and partitions as described in "Removing Protection" on page 126. This disables remote boot and restarts your computer. Then protect them again as described in "Protecting Your Disks" on page 98, reusing the existing backups. If you need to recover other data disks or partitions, you can do so as described in "Recovering a Data Disk" on page 116. However, you must do this after you remove protection and then reprotect the disks. 19. Enable remote boot again as described in "Enabling Remote Boot" on page 111. Intel® Entry Storage System SS4000-E User Guide 125
-
 1
1 -
2
-
3
-
4
-
5
-
6
-
7
-
8
-
9
-
10
-
11
-
12
-
13
-
14
-
15
-
16
-
17
-
18
-
19
-
20
-
21
-
22
-
23
-
24
-
25
-
26
-
27
-
28
-
29
-
30
-
31
-
32
-
33
-
34
-
35
-
36
-
37
-
38
-
39
-
40
-
41
-
42
-
43
-
44
-
45
-
46
-
47
-
48
-
49
-
50
-
51
-
52
-
53
-
54
-
55
-
56
-
57
-
58
-
59
-
60
-
61
-
62
-
63
-
64
-
65
-
66
-
67
-
68
-
69
-
70
-
71
-
72
-
73
-
74
-
75
-
76
-
77
-
78
-
79
-
80
-
81
-
82
-
83
-
84
-
85
-
86
-
87
-
88
-
89
-
90
-
91
-
92
-
93
-
94
-
95
-
96
-
97
-
98
-
99
-
100
-
101
-
102
-
103
-
104
-
105
-
106
-
107
-
108
-
109
-
110
-
111
-
112
-
113
-
114
-
115
-
116
-
117
-
118
-
119
-
120
-
121
-
122
-
123
-
124
-
125
-
126
-
127
-
128
-
129
-
130
-
131
-
132
-
133
-
134
-
135
-
 136
136 -
 137
137 -
 138
138 -
 139
139 -
 140
140 -
 141
141 -
 142
142 -
 143
143 -
 144
144 -
 145
145 -
 146
146 -
147
-
148
-
149
-
150
-
151
-
152
-
153
-
154
-
155
-
156
-
157
-
158
-
159
-
160
-
161
-
162
-
163
-
164
-
165
-
166
-
167
-
168
-
169
-
170
-
171
-
172
-
173
-
174
-
175
-
176
-
177
-
178
-
179
-
180
-
181
-
182
-
183
-
184
-
185
-
186
-
187
-
188
-
189
-
190
-
191
-
192
-
193
-
194
-
195
-
196
-
197
-
198
-
199
-
200
-
201
-
202
-
203
-
204
-
205
-
206
-
207
-
208
-
209
-
210
-
211
-
212
-
213
-
214
-
215
-
216
-
217
-
218
-
219
-
220
-
221
-
222
-
223
-
224
-
225
-
226
-
227
-
228
-
229
-
230
-
231
-
232
-
233
-
234
-
235
-
236
-
237
-
238
-
239
-
240
-
241
-
242
-
243
-
244
-
245
-
246
 |
 |
