Intel SS4000-E User Guide - Page 79
Test E-mail, Sender e-mail address - default password
 |
UPC - 735858182652
View all Intel SS4000-E manuals
Add to My Manuals
Save this manual to your list of manuals |
Page 79 highlights
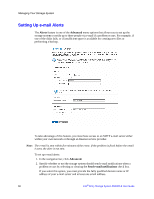
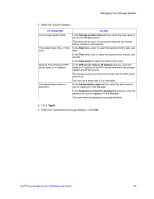
Managing Your Storage System If you clear this option, e-mail notifications is not sent, and all the related fields on this page display dimmed. However, if you previously entered information on this page, that information is retained so that you can easily re-enable e-mail notifications later. If you clear this option, you do not have to complete the rest of this procedure; simply click Apply. 3. In the SMTP server name or IP address text box, enter the fully qualified domain name or IP address of your e-mail server. 4. Specify where or not your e-mail server requires authentication by selecting or clearing the SMTP server authentication check box. If you select this option, you must enter a user name and password for logging into that server in the User name and Password text boxes. If you clear this option, no authentication is performed. 5. If your e-mail server cannot use the default sender e-mail address (root@localhost), or if you want the individuals who receive e-mail notifications to be able to reply to the alert, enter the address that you want to display as the return address in the Sender e-mail address text box. For example, you might enter your own e-mail address, such as [email protected]. 6. In the First e-mail address text box, enter the e-mail address of an individual who should receive e-mail notifications when a problem occurs. The e-mail address can be up to 128 characters long and must include the @ symbol, such as [email protected]. 7. If you want e-mail notifications to be sent to other individuals as well, enter the appropriate e-mail addresses in the Second e-mail address and Third e-mail address text boxes. 8. Click Apply. 9. When the confirmation message displays, click OK. 10. To confirm that the configuration is correct, click Test E-mail, and click OK on the confirmation message. This sends a test message to the specified recipients. If they do not receive the test message, make sure that all the entries on this page are correct. You might also have to modify the network settings, such as the gateway. For information about changing the network settings, see "Changing the Network Settings" on page 68. Intel® Entry Storage System SS4000-E User Guide 63
-
 1
1 -
2
-
3
-
4
-
5
-
6
-
7
-
8
-
9
-
10
-
11
-
12
-
13
-
14
-
15
-
16
-
17
-
18
-
19
-
20
-
21
-
22
-
23
-
24
-
25
-
26
-
27
-
28
-
29
-
30
-
31
-
32
-
33
-
34
-
35
-
36
-
37
-
38
-
39
-
40
-
41
-
42
-
43
-
44
-
45
-
46
-
47
-
48
-
49
-
50
-
51
-
52
-
53
-
54
-
55
-
56
-
57
-
58
-
59
-
60
-
61
-
62
-
63
-
64
-
65
-
66
-
67
-
68
-
69
-
70
-
71
-
72
-
73
-
 74
74 -
 75
75 -
 76
76 -
 77
77 -
 78
78 -
 79
79 -
 80
80 -
 81
81 -
 82
82 -
 83
83 -
 84
84 -
85
-
86
-
87
-
88
-
89
-
90
-
91
-
92
-
93
-
94
-
95
-
96
-
97
-
98
-
99
-
100
-
101
-
102
-
103
-
104
-
105
-
106
-
107
-
108
-
109
-
110
-
111
-
112
-
113
-
114
-
115
-
116
-
117
-
118
-
119
-
120
-
121
-
122
-
123
-
124
-
125
-
126
-
127
-
128
-
129
-
130
-
131
-
132
-
133
-
134
-
135
-
136
-
137
-
138
-
139
-
140
-
141
-
142
-
143
-
144
-
145
-
146
-
147
-
148
-
149
-
150
-
151
-
152
-
153
-
154
-
155
-
156
-
157
-
158
-
159
-
160
-
161
-
162
-
163
-
164
-
165
-
166
-
167
-
168
-
169
-
170
-
171
-
172
-
173
-
174
-
175
-
176
-
177
-
178
-
179
-
180
-
181
-
182
-
183
-
184
-
185
-
186
-
187
-
188
-
189
-
190
-
191
-
192
-
193
-
194
-
195
-
196
-
197
-
198
-
199
-
200
-
201
-
202
-
203
-
204
-
205
-
206
-
207
-
208
-
209
-
210
-
211
-
212
-
213
-
214
-
215
-
216
-
217
-
218
-
219
-
220
-
221
-
222
-
223
-
224
-
225
-
226
-
227
-
228
-
229
-
230
-
231
-
232
-
233
-
234
-
235
-
236
-
237
-
238
-
239
-
240
-
241
-
242
-
243
-
244
-
245
-
246
 |
 |
