Intel SS4000-E User Guide - Page 150
Swapping Hard Disks, Transferring Hard Disks to a New Storage System, Disk Change Notification
 |
UPC - 735858182652
View all Intel SS4000-E manuals
Add to My Manuals
Save this manual to your list of manuals |
Page 150 highlights
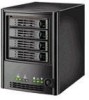
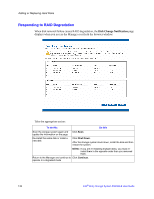
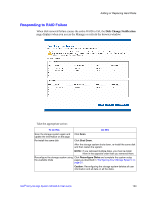
Adding or Replacing Hard Disks Swapping Hard Disks If you are using RAID 5 + spare or RAID 10, you can move the hard disks from one slot to another whether or not the storage system is running. However, if you do this when the storage system is running, you can swap only two disks, and you must restart the system after you swap the disks. If you swap the disks when the storage system is not running, you can swap all four disks, and the system functions as it previously did when you restart it. Note: For RAID 5 + spare, if you swap the disks when the storage system is running, one of the swapped disks must be the spare. For RAID 10, the swapped disks must be in different pairs. For example, you can swap disks 1 and 3 or disks 2 and 4, but not disks 1 and 2, as those are members of the same pair. If the storage system is running when you swap the disks, the Disk Change Notification page appears as shown in the preceding section. Click Shut Down and then restart the system. For all other disk configurations (linear, RAID 0, RAID 1, and RAID 5), you can swap the hard disks only when the storage system is powered off, and you can swap all four disks. Transferring Hard Disks to a New Storage System If your storage system unit fails but the hard disks themselves are viable, you can transfer your existing hard disks to a new storage system, thereby preserving all your existing data. To transfer hard disks to a new storage system: 1. Shut down both the old unit and the new unit. Caution: If you do not shut down the new unit before you insert the hard disks, you are prompted to re-initialize the disks. If you do this, all the data on your hard disks is lost. 2. Transfer the hard disks to the new unit. 3. Connect the new unit to your network and power on the new unit. 4. Access the Manager for the new unit as described in "Accessing the Manager" on page 25. As long as the new unit is in the same subnet as the old unit, you can access the Manager using the same procedure you used previously. However, if the new unit is in a different subnet, you might have to install the Console on a computer in the same subnet as the storage system and use the Console to access it. 134 Intel® Entry Storage System SS4000-E User Guide
-
 1
1 -
2
-
3
-
4
-
5
-
6
-
7
-
8
-
9
-
10
-
11
-
12
-
13
-
14
-
15
-
16
-
17
-
18
-
19
-
20
-
21
-
22
-
23
-
24
-
25
-
26
-
27
-
28
-
29
-
30
-
31
-
32
-
33
-
34
-
35
-
36
-
37
-
38
-
39
-
40
-
41
-
42
-
43
-
44
-
45
-
46
-
47
-
48
-
49
-
50
-
51
-
52
-
53
-
54
-
55
-
56
-
57
-
58
-
59
-
60
-
61
-
62
-
63
-
64
-
65
-
66
-
67
-
68
-
69
-
70
-
71
-
72
-
73
-
74
-
75
-
76
-
77
-
78
-
79
-
80
-
81
-
82
-
83
-
84
-
85
-
86
-
87
-
88
-
89
-
90
-
91
-
92
-
93
-
94
-
95
-
96
-
97
-
98
-
99
-
100
-
101
-
102
-
103
-
104
-
105
-
106
-
107
-
108
-
109
-
110
-
111
-
112
-
113
-
114
-
115
-
116
-
117
-
118
-
119
-
120
-
121
-
122
-
123
-
124
-
125
-
126
-
127
-
128
-
129
-
130
-
131
-
132
-
133
-
134
-
135
-
136
-
137
-
138
-
139
-
140
-
141
-
142
-
143
-
144
-
 145
145 -
 146
146 -
 147
147 -
 148
148 -
 149
149 -
 150
150 -
 151
151 -
 152
152 -
 153
153 -
 154
154 -
 155
155 -
156
-
157
-
158
-
159
-
160
-
161
-
162
-
163
-
164
-
165
-
166
-
167
-
168
-
169
-
170
-
171
-
172
-
173
-
174
-
175
-
176
-
177
-
178
-
179
-
180
-
181
-
182
-
183
-
184
-
185
-
186
-
187
-
188
-
189
-
190
-
191
-
192
-
193
-
194
-
195
-
196
-
197
-
198
-
199
-
200
-
201
-
202
-
203
-
204
-
205
-
206
-
207
-
208
-
209
-
210
-
211
-
212
-
213
-
214
-
215
-
216
-
217
-
218
-
219
-
220
-
221
-
222
-
223
-
224
-
225
-
226
-
227
-
228
-
229
-
230
-
231
-
232
-
233
-
234
-
235
-
236
-
237
-
238
-
239
-
240
-
241
-
242
-
243
-
244
-
245
-
246
 |
 |
