Intel SS4000-E User Guide - Page 157
Removing Drive Carrier from Storage System, Removing Baffle from Drive Carrier
 |
UPC - 735858182652
View all Intel SS4000-E manuals
Add to My Manuals
Save this manual to your list of manuals |
Page 157 highlights
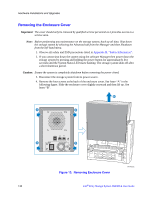
Hardware Installations and Upgrades 4. Press in the green latch at the end of the drive carrier to disengage the drive carrier from the storage system. Pull out on the black lever to pull the drive carrier out of the storage system. 1 2 3 4 1 2 TP000230 Figure 15. Removing Drive Carrier from Storage System 5. Remove the four screws that attach the plastic baffle or defective hard disk to the drive carrier. Two screws are located on each side of the drive carrier. Note: Store the plastic baffle for future use. TP00928 Figure 16. Removing Baffle from Drive Carrier Intel® Entry Storage System SS4000-E User Guide 141
-
 1
1 -
2
-
3
-
4
-
5
-
6
-
7
-
8
-
9
-
10
-
11
-
12
-
13
-
14
-
15
-
16
-
17
-
18
-
19
-
20
-
21
-
22
-
23
-
24
-
25
-
26
-
27
-
28
-
29
-
30
-
31
-
32
-
33
-
34
-
35
-
36
-
37
-
38
-
39
-
40
-
41
-
42
-
43
-
44
-
45
-
46
-
47
-
48
-
49
-
50
-
51
-
52
-
53
-
54
-
55
-
56
-
57
-
58
-
59
-
60
-
61
-
62
-
63
-
64
-
65
-
66
-
67
-
68
-
69
-
70
-
71
-
72
-
73
-
74
-
75
-
76
-
77
-
78
-
79
-
80
-
81
-
82
-
83
-
84
-
85
-
86
-
87
-
88
-
89
-
90
-
91
-
92
-
93
-
94
-
95
-
96
-
97
-
98
-
99
-
100
-
101
-
102
-
103
-
104
-
105
-
106
-
107
-
108
-
109
-
110
-
111
-
112
-
113
-
114
-
115
-
116
-
117
-
118
-
119
-
120
-
121
-
122
-
123
-
124
-
125
-
126
-
127
-
128
-
129
-
130
-
131
-
132
-
133
-
134
-
135
-
136
-
137
-
138
-
139
-
140
-
141
-
142
-
143
-
144
-
145
-
146
-
147
-
148
-
149
-
150
-
151
-
 152
152 -
 153
153 -
 154
154 -
 155
155 -
 156
156 -
 157
157 -
 158
158 -
 159
159 -
 160
160 -
 161
161 -
 162
162 -
163
-
164
-
165
-
166
-
167
-
168
-
169
-
170
-
171
-
172
-
173
-
174
-
175
-
176
-
177
-
178
-
179
-
180
-
181
-
182
-
183
-
184
-
185
-
186
-
187
-
188
-
189
-
190
-
191
-
192
-
193
-
194
-
195
-
196
-
197
-
198
-
199
-
200
-
201
-
202
-
203
-
204
-
205
-
206
-
207
-
208
-
209
-
210
-
211
-
212
-
213
-
214
-
215
-
216
-
217
-
218
-
219
-
220
-
221
-
222
-
223
-
224
-
225
-
226
-
227
-
228
-
229
-
230
-
231
-
232
-
233
-
234
-
235
-
236
-
237
-
238
-
239
-
240
-
241
-
242
-
243
-
244
-
245
-
246
 |
 |

Hardware Installations and Upgrades
Intel
®
Entry Storage System SS4000-E User Guide
141
4.
Press in the green latch at the end of the drive carrier to disengage the drive carrier
from the storage system. Pull out on the black lever to pull the drive carrier out of the
storage system.
Figure 15.
Removing Drive Carrier from Storage System
5.
Remove the four screws that attach the plastic baffle or defective hard disk to the
drive carrier. Two screws are located on each side of the drive carrier.
Note:
Store the plastic baffle for future use.
Figure 16.
Removing Baffle from Drive Carrier
TP000230
4
3
2
1
1
2
TP00928