Intel SS4000-E User Guide - Page 153
Hardware Installations and Upgrades, Before You Begin, Tools and Supplies Needed, System References - power supply
 |
UPC - 735858182652
View all Intel SS4000-E manuals
Add to My Manuals
Save this manual to your list of manuals |
Page 153 highlights
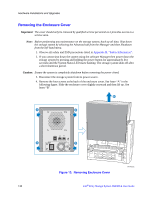
Hardware Installations and Upgrades 7 Hardware Installations and Upgrades This chapter provides instructions for removing, installing, and replacing storage system components in your Intel® Entry Storage System SS4000-E. Note: Maintenance procedures should be done by qualified technical personnel. Caution: It is recommended that you fit and check a suitable anti-static wrist and conductive foam pad and observe all conventional ESD precautions when handling storage system modules and components. Avoid contact with the backplane components and module connectors. Before You Begin Before working with your storage system, review the important safety information listed in Appendix H, "Safety Information". Tools and Supplies Needed • Phillips* (cross head) screwdriver (#1 bit and #2 bit) • Anti-static wrist strap and conductive foam pad (recommended) System References All references to the left, right, front, top, and bottom assume the reader is facing the front of the storage system as it would be positioned for normal operation. Removing or Installing the Enclosure Cover Warning: The enclosure cover must only be removed by a service personnel. Potential hazards include: • Energy hazard • Rotating fans • Hot surfaces • Access to power supply unit openings Upon replacement, the cover MUST be secured by tightening the retaining screw with a screwdriver. Intel® Entry Storage System SS4000-E User Guide 137
-
 1
1 -
2
-
3
-
4
-
5
-
6
-
7
-
8
-
9
-
10
-
11
-
12
-
13
-
14
-
15
-
16
-
17
-
18
-
19
-
20
-
21
-
22
-
23
-
24
-
25
-
26
-
27
-
28
-
29
-
30
-
31
-
32
-
33
-
34
-
35
-
36
-
37
-
38
-
39
-
40
-
41
-
42
-
43
-
44
-
45
-
46
-
47
-
48
-
49
-
50
-
51
-
52
-
53
-
54
-
55
-
56
-
57
-
58
-
59
-
60
-
61
-
62
-
63
-
64
-
65
-
66
-
67
-
68
-
69
-
70
-
71
-
72
-
73
-
74
-
75
-
76
-
77
-
78
-
79
-
80
-
81
-
82
-
83
-
84
-
85
-
86
-
87
-
88
-
89
-
90
-
91
-
92
-
93
-
94
-
95
-
96
-
97
-
98
-
99
-
100
-
101
-
102
-
103
-
104
-
105
-
106
-
107
-
108
-
109
-
110
-
111
-
112
-
113
-
114
-
115
-
116
-
117
-
118
-
119
-
120
-
121
-
122
-
123
-
124
-
125
-
126
-
127
-
128
-
129
-
130
-
131
-
132
-
133
-
134
-
135
-
136
-
137
-
138
-
139
-
140
-
141
-
142
-
143
-
144
-
145
-
146
-
147
-
 148
148 -
 149
149 -
 150
150 -
 151
151 -
 152
152 -
 153
153 -
 154
154 -
 155
155 -
 156
156 -
 157
157 -
 158
158 -
159
-
160
-
161
-
162
-
163
-
164
-
165
-
166
-
167
-
168
-
169
-
170
-
171
-
172
-
173
-
174
-
175
-
176
-
177
-
178
-
179
-
180
-
181
-
182
-
183
-
184
-
185
-
186
-
187
-
188
-
189
-
190
-
191
-
192
-
193
-
194
-
195
-
196
-
197
-
198
-
199
-
200
-
201
-
202
-
203
-
204
-
205
-
206
-
207
-
208
-
209
-
210
-
211
-
212
-
213
-
214
-
215
-
216
-
217
-
218
-
219
-
220
-
221
-
222
-
223
-
224
-
225
-
226
-
227
-
228
-
229
-
230
-
231
-
232
-
233
-
234
-
235
-
236
-
237
-
238
-
239
-
240
-
241
-
242
-
243
-
244
-
245
-
246
 |
 |
