Intel SS4000-E User Guide - Page 89
Reconfiguring the Disks, Advanced, Disks, Administrator password, Disk Configuration
 |
UPC - 735858182652
View all Intel SS4000-E manuals
Add to My Manuals
Save this manual to your list of manuals |
Page 89 highlights
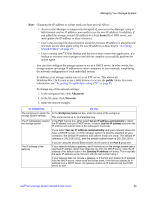
Managing Your Storage System 4. Select the amount of disk space to allocate. You can choose to allocate the maximum available space or specify any amount. It is recommended that you limit expansion to 20 GB at a time due to the extensive processing time required for large expansions. To allocate additional space, select the Specify disk space button and specify 1 GB or higher. You can specify only whole numbers. Note: Allocated space is approximate. A small amount will be used by the file system. For example, allocating 200 MB might display as 195 MB on the screen. 5. Click OK. 6. When the confirmation message displays, click OK. Reconfiguring the Disks Caution: Changing the disk configuration deletes all user information and all data on the disks. Before you do this, have all the users disconnect from all shared folders, as described in "Disconnecting from Shared Folders" on page 86, and remove protection from all disks as described in "Removing Protection" on page 126. When you are done, you must re-add all users as described in "Adding Users" on page 41, create new shared folders as described in "Creating Shared Folders" on page 35, and protect their disks as described in "Protecting Your Disks" on page 98. To change the disk configuration: 1. In the navigation bar, click Advanced. 2. In the left pane, click Disks. 3. In the Administrator password text box, enter your password for logging in to the Manager. 4. Click Reconfigure Disks. 5. When the confirmation message displays, click OK. The Disk Configuration page displays. The options that appear on this page vary, depending on the number of hard disks that are currently installed in the system. Intel® Entry Storage System SS4000-E User Guide 73
-
 1
1 -
2
-
3
-
4
-
5
-
6
-
7
-
8
-
9
-
10
-
11
-
12
-
13
-
14
-
15
-
16
-
17
-
18
-
19
-
20
-
21
-
22
-
23
-
24
-
25
-
26
-
27
-
28
-
29
-
30
-
31
-
32
-
33
-
34
-
35
-
36
-
37
-
38
-
39
-
40
-
41
-
42
-
43
-
44
-
45
-
46
-
47
-
48
-
49
-
50
-
51
-
52
-
53
-
54
-
55
-
56
-
57
-
58
-
59
-
60
-
61
-
62
-
63
-
64
-
65
-
66
-
67
-
68
-
69
-
70
-
71
-
72
-
73
-
74
-
75
-
76
-
77
-
78
-
79
-
80
-
81
-
82
-
83
-
 84
84 -
 85
85 -
 86
86 -
 87
87 -
 88
88 -
 89
89 -
 90
90 -
 91
91 -
 92
92 -
 93
93 -
 94
94 -
95
-
96
-
97
-
98
-
99
-
100
-
101
-
102
-
103
-
104
-
105
-
106
-
107
-
108
-
109
-
110
-
111
-
112
-
113
-
114
-
115
-
116
-
117
-
118
-
119
-
120
-
121
-
122
-
123
-
124
-
125
-
126
-
127
-
128
-
129
-
130
-
131
-
132
-
133
-
134
-
135
-
136
-
137
-
138
-
139
-
140
-
141
-
142
-
143
-
144
-
145
-
146
-
147
-
148
-
149
-
150
-
151
-
152
-
153
-
154
-
155
-
156
-
157
-
158
-
159
-
160
-
161
-
162
-
163
-
164
-
165
-
166
-
167
-
168
-
169
-
170
-
171
-
172
-
173
-
174
-
175
-
176
-
177
-
178
-
179
-
180
-
181
-
182
-
183
-
184
-
185
-
186
-
187
-
188
-
189
-
190
-
191
-
192
-
193
-
194
-
195
-
196
-
197
-
198
-
199
-
200
-
201
-
202
-
203
-
204
-
205
-
206
-
207
-
208
-
209
-
210
-
211
-
212
-
213
-
214
-
215
-
216
-
217
-
218
-
219
-
220
-
221
-
222
-
223
-
224
-
225
-
226
-
227
-
228
-
229
-
230
-
231
-
232
-
233
-
234
-
235
-
236
-
237
-
238
-
239
-
240
-
241
-
242
-
243
-
244
-
245
-
246
 |
 |
