Konica Minolta AccurioPress C2070 IC-314 User Guide - Page 161
Printing a nested saddle-stitch job, Horizontal Offset
 |
View all Konica Minolta AccurioPress C2070 manuals
Add to My Manuals
Save this manual to your list of manuals |
Page 161 highlights
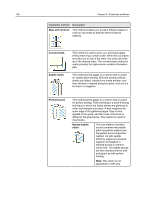
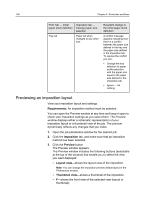
Printing a nested saddle-stitch job 151 1. In the Storage area, double-click your job. 2. In the job parameters window, click the Imposition tab. 3. In the Method list, select Saddle stitch. 4. In the Sets per sheet list, select 2 to print two sets of your imposed job on one printed sheet. 5. Click the Marks parameter. 6. In the Marks list, select Crop marks. 7. Change the position of the marks on the image by adjusting the values in the Horizontal Offset and Vertical Offset boxes. 8. In the Mark color list, select the color for the mark. 9. Click the Spacing parameter. 10. In the Spacing area adjust the values for: ● Margins ● Horizontal gutter ● Vertical gutter ● Spine 11. In the Custom bleed size box, type 0.118 inches or 3 mm. 12. Click the Preview button. The Preview window appears. The thumbnail view displays a thumbnail of the imposition; the schematic view displays a representation of the imposition layout. 13. Close the Preview window. 14. Click Submit. Your job is processed and printed according to the imposition settings for two sets per sheet. You have used most of the sheet's space and saved on paper. You can also easily cut and staple the two brochures. Printing a nested saddle-stitch job Use the nested saddle-stitch imposition method to print a book. ● This example assumes that your job is a 120‑page book with a trim size of 8.2 by 11.0 inches. Each booklet will include four sheets (16 pages). ● Create a finishing mark set to determine where the finisher will cut.
-
 1
1 -
2
-
3
-
4
-
5
-
6
-
7
-
8
-
9
-
10
-
11
-
12
-
13
-
14
-
15
-
16
-
17
-
18
-
19
-
20
-
21
-
22
-
23
-
24
-
25
-
26
-
27
-
28
-
29
-
30
-
31
-
32
-
33
-
34
-
35
-
36
-
37
-
38
-
39
-
40
-
41
-
42
-
43
-
44
-
45
-
46
-
47
-
48
-
49
-
50
-
51
-
52
-
53
-
54
-
55
-
56
-
57
-
58
-
59
-
60
-
61
-
62
-
63
-
64
-
65
-
66
-
67
-
68
-
69
-
70
-
71
-
72
-
73
-
74
-
75
-
76
-
77
-
78
-
79
-
80
-
81
-
82
-
83
-
84
-
85
-
86
-
87
-
88
-
89
-
90
-
91
-
92
-
93
-
94
-
95
-
96
-
97
-
98
-
99
-
100
-
101
-
102
-
103
-
104
-
105
-
106
-
107
-
108
-
109
-
110
-
111
-
112
-
113
-
114
-
115
-
116
-
117
-
118
-
119
-
120
-
121
-
122
-
123
-
124
-
125
-
126
-
127
-
128
-
129
-
130
-
131
-
132
-
133
-
134
-
135
-
136
-
137
-
138
-
139
-
140
-
141
-
142
-
143
-
144
-
145
-
146
-
147
-
148
-
149
-
150
-
151
-
152
-
153
-
154
-
155
-
 156
156 -
 157
157 -
 158
158 -
 159
159 -
 160
160 -
 161
161 -
 162
162 -
 163
163 -
 164
164 -
 165
165 -
 166
166 -
167
-
168
-
169
-
170
-
171
-
172
-
173
-
174
-
175
-
176
-
177
-
178
-
179
-
180
-
181
-
182
-
183
-
184
-
185
-
186
-
187
-
188
-
189
-
190
-
191
-
192
-
193
-
194
-
195
-
196
-
197
-
198
-
199
-
200
-
201
-
202
-
203
-
204
-
205
-
206
-
207
-
208
-
209
-
210
-
211
-
212
-
213
-
214
-
215
-
216
-
217
-
218
-
219
-
220
-
221
-
222
-
223
-
224
-
225
-
226
-
227
-
228
-
229
-
230
-
231
-
232
-
233
-
234
-
235
-
236
-
237
-
238
-
239
-
240
-
241
-
242
-
243
-
244
-
245
-
246
-
247
-
248
-
249
-
250
-
251
-
252
-
253
-
254
-
255
-
256
-
257
-
258
-
259
-
260
-
261
-
262
-
263
-
264
-
265
-
266
-
267
-
268
-
269
-
270
-
271
-
272
-
273
-
274
-
275
-
276
-
277
-
278
-
279
-
280
-
281
-
282
-
283
-
284
-
285
-
286
-
287
-
288
-
289
-
290
-
291
-
292
-
293
-
294
-
295
-
296
-
297
-
298
-
299
-
300
-
301
-
302
-
303
-
304
-
305
 |
 |
