Konica Minolta AccurioPress C2070 IC-314 User Guide - Page 279
Tools, Resource Center, Resource, Mark Sets, Add Mark Type, Mark Type, Barcode Mark, Height
 |
View all Konica Minolta AccurioPress C2070 manuals
Add to My Manuals
Save this manual to your list of manuals |
Page 279 highlights
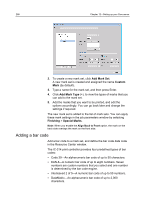
Using mark sets 269 1. From the Tools menu, select Resource Center. 2. In the Resource list, make sure that Mark Sets is selected. 3. Select a mark set, and then click Add Mark Type or click to select an existing mark. 4. In the Mark Type list, select Barcode Mark. 5. In the Height area, type the height of the bar code that you want to add. You cannot change the bar code's width. 6. In the Barcode Type list, select the bar code that you want to add. 7. Click Edit Variables. The Edit Barcode Variable window appears. 8. In the Enter a barcode value area, type the bar code value according to the requirements of the type of bar code that you selected.
-
 1
1 -
2
-
3
-
4
-
5
-
6
-
7
-
8
-
9
-
10
-
11
-
12
-
13
-
14
-
15
-
16
-
17
-
18
-
19
-
20
-
21
-
22
-
23
-
24
-
25
-
26
-
27
-
28
-
29
-
30
-
31
-
32
-
33
-
34
-
35
-
36
-
37
-
38
-
39
-
40
-
41
-
42
-
43
-
44
-
45
-
46
-
47
-
48
-
49
-
50
-
51
-
52
-
53
-
54
-
55
-
56
-
57
-
58
-
59
-
60
-
61
-
62
-
63
-
64
-
65
-
66
-
67
-
68
-
69
-
70
-
71
-
72
-
73
-
74
-
75
-
76
-
77
-
78
-
79
-
80
-
81
-
82
-
83
-
84
-
85
-
86
-
87
-
88
-
89
-
90
-
91
-
92
-
93
-
94
-
95
-
96
-
97
-
98
-
99
-
100
-
101
-
102
-
103
-
104
-
105
-
106
-
107
-
108
-
109
-
110
-
111
-
112
-
113
-
114
-
115
-
116
-
117
-
118
-
119
-
120
-
121
-
122
-
123
-
124
-
125
-
126
-
127
-
128
-
129
-
130
-
131
-
132
-
133
-
134
-
135
-
136
-
137
-
138
-
139
-
140
-
141
-
142
-
143
-
144
-
145
-
146
-
147
-
148
-
149
-
150
-
151
-
152
-
153
-
154
-
155
-
156
-
157
-
158
-
159
-
160
-
161
-
162
-
163
-
164
-
165
-
166
-
167
-
168
-
169
-
170
-
171
-
172
-
173
-
174
-
175
-
176
-
177
-
178
-
179
-
180
-
181
-
182
-
183
-
184
-
185
-
186
-
187
-
188
-
189
-
190
-
191
-
192
-
193
-
194
-
195
-
196
-
197
-
198
-
199
-
200
-
201
-
202
-
203
-
204
-
205
-
206
-
207
-
208
-
209
-
210
-
211
-
212
-
213
-
214
-
215
-
216
-
217
-
218
-
219
-
220
-
221
-
222
-
223
-
224
-
225
-
226
-
227
-
228
-
229
-
230
-
231
-
232
-
233
-
234
-
235
-
236
-
237
-
238
-
239
-
240
-
241
-
242
-
243
-
244
-
245
-
246
-
247
-
248
-
249
-
250
-
251
-
252
-
253
-
254
-
255
-
256
-
257
-
258
-
259
-
260
-
261
-
262
-
263
-
264
-
265
-
266
-
267
-
268
-
269
-
270
-
271
-
272
-
273
-
 274
274 -
 275
275 -
 276
276 -
 277
277 -
 278
278 -
 279
279 -
 280
280 -
 281
281 -
 282
282 -
 283
283 -
 284
284 -
285
-
286
-
287
-
288
-
289
-
290
-
291
-
292
-
293
-
294
-
295
-
296
-
297
-
298
-
299
-
300
-
301
-
302
-
303
-
304
-
305
 |
 |

1.
From the
Tools
menu, select
Resource Center
.
2.
In the
Resource
list, make sure that
Mark Sets
is selected.
3.
Select a mark set, and then click
Add Mark Type
or click to
select an existing mark.
4.
In the
Mark Type
list, select
Barcode Mark
.
5.
In the
Height
area, type the height of the bar code that you
want to add.
You cannot change the bar code's width.
6.
In the
Barcode Type
list, select the bar code that you want to
add.
7.
Click
Edit Variables
.
The Edit Barcode Variable window appears.
8.
In the
Enter a barcode value
area, type the bar code value
according to the requirements of the type of bar code that you
selected.
Using mark sets
269