Konica Minolta AccurioPress C2070 IC-314 User Guide - Page 41
Start, Save Calibration Results, As default name, Save as, Apply to, All Media Types, Select
 |
View all Konica Minolta AccurioPress C2070 manuals
Add to My Manuals
Save this manual to your list of manuals |
Page 41 highlights
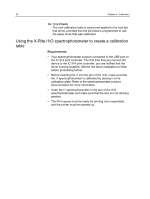
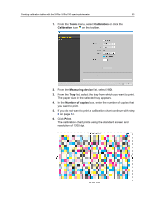
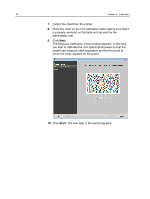
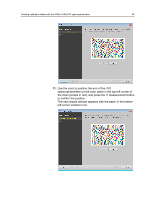
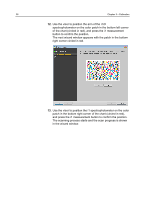
Creating calibration tables with the X-Rite i1/iSis/i1iO spectrophotometer 31 7. Collect the chart from the printer. 8. Trim (cut) the edges of the i1 iSis calibration chart along the dotted lines. 9. Click Next. The Measure Calibration screen of the Calibration wizard appears. In this step you start to scan the calibration chart so that the device can measure each separation and find the point at which the toner appears on the paper. 10. Insert the i1 iSis calibration chart into the front of the i1 iSis, making sure the left side of the chart is aligned on the left of the iSis. 11. In the Measure Calibration Chart window, click Start. The iSis starts the calibration process and its progress is shown in the Measure Calibration Chart window. After the i1 iSis calibration chart is successfully scanned, the Save screen of the Calibration wizard appears. 12. In the Save Calibration Results area, select if you want the calibration results saved As default name or select Save as, and enter a name for the calibration table in the text box. Note: When you save the calibration table it applies only to the paper type that was calibrated, unless you select to apply it to all paper types, as described in the next step. 13. In the Apply to area, choose if you want the calibration table to apply to All Media Types, or choose Select and select the respective media types to which you want the calibration table to apply.
-
 1
1 -
2
-
3
-
4
-
5
-
6
-
7
-
8
-
9
-
10
-
11
-
12
-
13
-
14
-
15
-
16
-
17
-
18
-
19
-
20
-
21
-
22
-
23
-
24
-
25
-
26
-
27
-
28
-
29
-
30
-
31
-
32
-
33
-
34
-
35
-
 36
36 -
 37
37 -
 38
38 -
 39
39 -
 40
40 -
 41
41 -
 42
42 -
 43
43 -
 44
44 -
 45
45 -
 46
46 -
47
-
48
-
49
-
50
-
51
-
52
-
53
-
54
-
55
-
56
-
57
-
58
-
59
-
60
-
61
-
62
-
63
-
64
-
65
-
66
-
67
-
68
-
69
-
70
-
71
-
72
-
73
-
74
-
75
-
76
-
77
-
78
-
79
-
80
-
81
-
82
-
83
-
84
-
85
-
86
-
87
-
88
-
89
-
90
-
91
-
92
-
93
-
94
-
95
-
96
-
97
-
98
-
99
-
100
-
101
-
102
-
103
-
104
-
105
-
106
-
107
-
108
-
109
-
110
-
111
-
112
-
113
-
114
-
115
-
116
-
117
-
118
-
119
-
120
-
121
-
122
-
123
-
124
-
125
-
126
-
127
-
128
-
129
-
130
-
131
-
132
-
133
-
134
-
135
-
136
-
137
-
138
-
139
-
140
-
141
-
142
-
143
-
144
-
145
-
146
-
147
-
148
-
149
-
150
-
151
-
152
-
153
-
154
-
155
-
156
-
157
-
158
-
159
-
160
-
161
-
162
-
163
-
164
-
165
-
166
-
167
-
168
-
169
-
170
-
171
-
172
-
173
-
174
-
175
-
176
-
177
-
178
-
179
-
180
-
181
-
182
-
183
-
184
-
185
-
186
-
187
-
188
-
189
-
190
-
191
-
192
-
193
-
194
-
195
-
196
-
197
-
198
-
199
-
200
-
201
-
202
-
203
-
204
-
205
-
206
-
207
-
208
-
209
-
210
-
211
-
212
-
213
-
214
-
215
-
216
-
217
-
218
-
219
-
220
-
221
-
222
-
223
-
224
-
225
-
226
-
227
-
228
-
229
-
230
-
231
-
232
-
233
-
234
-
235
-
236
-
237
-
238
-
239
-
240
-
241
-
242
-
243
-
244
-
245
-
246
-
247
-
248
-
249
-
250
-
251
-
252
-
253
-
254
-
255
-
256
-
257
-
258
-
259
-
260
-
261
-
262
-
263
-
264
-
265
-
266
-
267
-
268
-
269
-
270
-
271
-
272
-
273
-
274
-
275
-
276
-
277
-
278
-
279
-
280
-
281
-
282
-
283
-
284
-
285
-
286
-
287
-
288
-
289
-
290
-
291
-
292
-
293
-
294
-
295
-
296
-
297
-
298
-
299
-
300
-
301
-
302
-
303
-
304
-
305
 |
 |
