Konica Minolta HP PageWide XL 5000 MFP User Guide - Page 108
Troubleshooting, How to improve productivity, Basket
 |
View all Konica Minolta HP PageWide XL 5000 MFP manuals
Add to My Manuals
Save this manual to your list of manuals |
Page 108 highlights
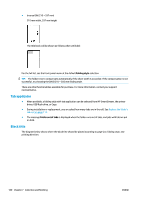
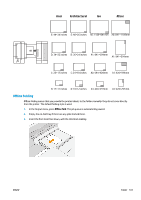
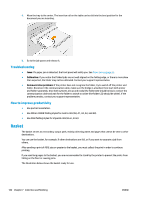
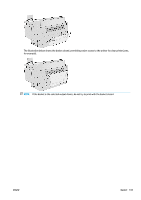
4. Move the tray to the center. The insertion rail on the table can be slid into the best position for the document you are inserting. 5. Go to the job queue and release it. Troubleshooting ● Jams: If a paper jam is detected, the front panel will notify you. See Paper jam on page 36. ● Calibration: If you notice that folded jobs are not well aligned on the folding edge, or there is more skew than expected, the folder may not be calibrated. Contact your support representative. ● Communication problems: If the printer does not recognize the folder, try to switch off the printer and folder. Disconnect the communication cable, make sure the bridge is attached, then start both printer and folder separately. Once both systems are up and ready (the folder LED should be blue), connect the communication cable and wait for the folder to switch to online (the folder LED should be white). If the problem persists, contact your support representative. How to improve productivity ● Use portrait orientation. ● Use DIN or AFNOR folding styles for metric rolls (A0, A1, A2, A3, and A4). ● Use ANSI folding styles for imperial rolls (36 in, 24 in). Basket The basket serves as a secondary output path, mainly collecting waste and pages that cannot be sent to other destinations. You can use the basket, for example, if other destinations are full, or if you want to separate a job from others. After sending a print of A0/E size or greater to the basket, you must collect the print in order to continue printing. If you send long pages to the basket, you are recommended to stand by the printer to prevent the prints from falling on the floor or causing jams. The illustration below shows the basket ready for use. 102 Chapter 7 Collection and finishing ENWW
-
 1
1 -
2
-
3
-
4
-
5
-
6
-
7
-
8
-
9
-
10
-
11
-
12
-
13
-
14
-
15
-
16
-
17
-
18
-
19
-
20
-
21
-
22
-
23
-
24
-
25
-
26
-
27
-
28
-
29
-
30
-
31
-
32
-
33
-
34
-
35
-
36
-
37
-
38
-
39
-
40
-
41
-
42
-
43
-
44
-
45
-
46
-
47
-
48
-
49
-
50
-
51
-
52
-
53
-
54
-
55
-
56
-
57
-
58
-
59
-
60
-
61
-
62
-
63
-
64
-
65
-
66
-
67
-
68
-
69
-
70
-
71
-
72
-
73
-
74
-
75
-
76
-
77
-
78
-
79
-
80
-
81
-
82
-
83
-
84
-
85
-
86
-
87
-
88
-
89
-
90
-
91
-
92
-
93
-
94
-
95
-
96
-
97
-
98
-
99
-
100
-
101
-
102
-
 103
103 -
 104
104 -
 105
105 -
 106
106 -
 107
107 -
 108
108 -
 109
109 -
 110
110 -
 111
111 -
 112
112 -
 113
113 -
114
-
115
-
116
-
117
-
118
-
119
-
120
-
121
-
122
-
123
-
124
-
125
-
126
-
127
-
128
-
129
-
130
-
131
-
132
-
133
-
134
-
135
-
136
-
137
-
138
-
139
-
140
-
141
-
142
 |
 |
