Konica Minolta HP PageWide XL 5000 MFP User Guide - Page 114
Select all, Advanced options, Enhanced printhead recovery, length accuracy
 |
View all Konica Minolta HP PageWide XL 5000 MFP manuals
Add to My Manuals
Save this manual to your list of manuals |
Page 114 highlights
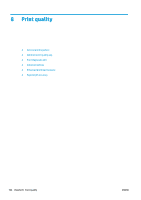
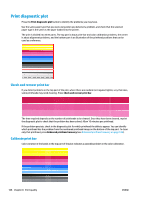
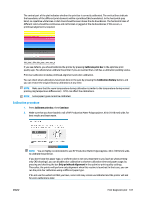
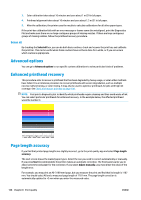
3. Color calibration takes about 16 minutes and uses about 1 m (39 in) of paper. 4. Printhead alignment takes about 16 minutes and uses about 1.3 m (51 in) of paper. 5. After the calibration, the printer uses the results to calculate calibrations for all other paper types. If the print-bar calibration fails with an error message or leaves some dies misaligned, print the Diagnostics Plot and make sure there are no large contiguous groups of missing nozzles. If there are large contiguous groups of missing nozzles, follow the printhead recovery procedure. Select all By checking the Select all box, you can do both basic routines: check and recover the print bar, and calibrate the print bar. This can be useful when these routines have not been done for a while, or if you are unsure which routine is appropriate. Advanced options You can go to Advanced options to run specific custom calibrations to solve particular kinds of problems. Enhanced printhead recovery This procedure aims to recover a printhead that has been degraded by heavy usage, or when other methods have failed. It is an intensive procedure to recover printheads with severe degradation, such as multiple nozzles malfunctioning, or color mixing. It may also be used to optimize printheads for jobs with high ink coverage. See Check and recover print bar on page 106. NOTE: First print a diagnostic plot to identify which printheads require cleaning and thus avoid waste of ink. You can select particular printheads for enhanced recovery. In the example below, the affected printhead would be number 3. Page length accuracy If you find that printed page lengths are slightly incorrect, go to the print quality app and select Page length accuracy. The next screen shows the loaded paper types. Select the one you need to correct automatically or manually. If you press Start (recommended), the printer makes an automatic correction. The front panel warns you to allow some time and paper for the correction. If you select Adjust manually, you must enter the value of the length error. For example, you may print an A0 (1189 mm) page, but you measure the print and find that its length is 1187 mm. You should select A0 and a measured page length of 1187 mm. The page length correction is automatically updated to +2 mm when you enter the measured value. 108 Chapter 8 Print quality ENWW
-
 1
1 -
2
-
3
-
4
-
5
-
6
-
7
-
8
-
9
-
10
-
11
-
12
-
13
-
14
-
15
-
16
-
17
-
18
-
19
-
20
-
21
-
22
-
23
-
24
-
25
-
26
-
27
-
28
-
29
-
30
-
31
-
32
-
33
-
34
-
35
-
36
-
37
-
38
-
39
-
40
-
41
-
42
-
43
-
44
-
45
-
46
-
47
-
48
-
49
-
50
-
51
-
52
-
53
-
54
-
55
-
56
-
57
-
58
-
59
-
60
-
61
-
62
-
63
-
64
-
65
-
66
-
67
-
68
-
69
-
70
-
71
-
72
-
73
-
74
-
75
-
76
-
77
-
78
-
79
-
80
-
81
-
82
-
83
-
84
-
85
-
86
-
87
-
88
-
89
-
90
-
91
-
92
-
93
-
94
-
95
-
96
-
97
-
98
-
99
-
100
-
101
-
102
-
103
-
104
-
105
-
106
-
107
-
108
-
 109
109 -
 110
110 -
 111
111 -
 112
112 -
 113
113 -
 114
114 -
 115
115 -
 116
116 -
 117
117 -
 118
118 -
 119
119 -
120
-
121
-
122
-
123
-
124
-
125
-
126
-
127
-
128
-
129
-
130
-
131
-
132
-
133
-
134
-
135
-
136
-
137
-
138
-
139
-
140
-
141
-
142
 |
 |