Konica Minolta HP PageWide XL 5000 MFP User Guide - Page 113
Calibration procedure, Calibrate print bar, Calibration history, Continue, Only printhead alignment
 |
View all Konica Minolta HP PageWide XL 5000 MFP manuals
Add to My Manuals
Save this manual to your list of manuals |
Page 113 highlights
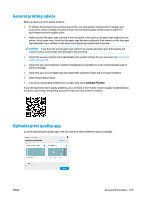
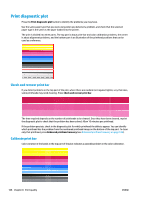
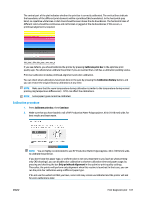
The central part of the plot indicates whether the print bar is correctly calibrated. The vertical lines indicate the boundaries of the different print elements within a printhead (die boundaries). In the horizontal gray band, no repetitive white lines or dark lines should be seen above the die boundaries. The horizontal lines of different colors should be continuous and not broken or jagged at the die boundaries; if this occurs, a printhead alignment is required. If you see defects, you should calibrate the printer by pressing Calibrate print bar in the optimize print quality app. You should also calibrate the printer if you are warned that a roll has a calibration pending status. Print-bar calibration includes printhead alignment and color calibration. You can check what calibrations have been done in the past by pressing the Calibration history button; and you can restore the original factory calibrations at any time. NOTE: Make sure that the room temperature during calibration is similar to the temperature during normal printing. Big temperature differences (> 10°C) can affect the calibrations. NOTE: Some paper types cannot be calibrated. Calibration procedure 1. Press Calibrate print bar, then Continue. 2. Make sure that you have loaded a roll of HP Production Matte Polypropylene, 40 in (1016 mm) wide, for best results and least waste. NOTE: You are highly recommended to use HP Production Matte Polypropylene, 40 in (1016mm) wide, to calibrate the print bar. If you don't have this paper type, or uniform color is not very important to you (such as when printing only CAD drawings), you can disable color calibration to shorten calibration time and paper usage, by pressing and checking the box Only printhead alignment in the optimize-print-quality settings. Thereafter, the printer will perform only alignment when this routine is launched. In that case, you can run the print-bar calibration using a different paper type. If do not use the widest roll that you have, some rolls may remain uncalibrated and the printer will ask for extra calibrations later. ENWW Print diagnostic plot 107
-
 1
1 -
2
-
3
-
4
-
5
-
6
-
7
-
8
-
9
-
10
-
11
-
12
-
13
-
14
-
15
-
16
-
17
-
18
-
19
-
20
-
21
-
22
-
23
-
24
-
25
-
26
-
27
-
28
-
29
-
30
-
31
-
32
-
33
-
34
-
35
-
36
-
37
-
38
-
39
-
40
-
41
-
42
-
43
-
44
-
45
-
46
-
47
-
48
-
49
-
50
-
51
-
52
-
53
-
54
-
55
-
56
-
57
-
58
-
59
-
60
-
61
-
62
-
63
-
64
-
65
-
66
-
67
-
68
-
69
-
70
-
71
-
72
-
73
-
74
-
75
-
76
-
77
-
78
-
79
-
80
-
81
-
82
-
83
-
84
-
85
-
86
-
87
-
88
-
89
-
90
-
91
-
92
-
93
-
94
-
95
-
96
-
97
-
98
-
99
-
100
-
101
-
102
-
103
-
104
-
105
-
106
-
107
-
 108
108 -
 109
109 -
 110
110 -
 111
111 -
 112
112 -
 113
113 -
 114
114 -
 115
115 -
 116
116 -
 117
117 -
 118
118 -
119
-
120
-
121
-
122
-
123
-
124
-
125
-
126
-
127
-
128
-
129
-
130
-
131
-
132
-
133
-
134
-
135
-
136
-
137
-
138
-
139
-
140
-
141
-
142
 |
 |
