Konica Minolta HP PageWide XL 5000 MFP User Guide - Page 118
Move or store the high-capacity stacker, Move or store the folder, Replace the folder’s tab reel
 |
View all Konica Minolta HP PageWide XL 5000 MFP manuals
Add to My Manuals
Save this manual to your list of manuals |
Page 118 highlights
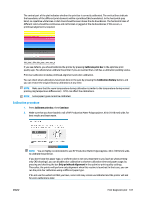
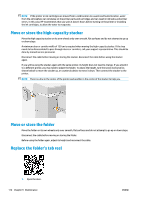
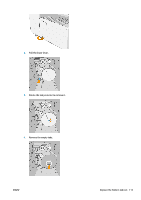
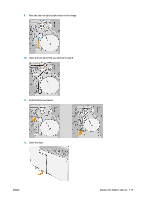
NOTE: If the printer or ink cartridges are moved from a cold location to a warm and humid location, water from the atmosphere can condense on the printer parts and cartridges and can result in ink leaks and printer errors. In this case, HP recommends that you wait at least 3 hours before turning on the printer or installing the ink cartridges, to allow the water to evaporate. Move or store the high-capacity stacker Move the high capacity stacker on its own wheels only over smooth, flat surfaces and do not attempt to go up or down steps. A minimum door or corridor width of 130 cm is required when moving the high-capacity stacker. If the tray needs to be disassembled to pass through doors or corridors, call your support representative. This should be done by trained service personnel. Disconnect the cable before moving or storing the stacker. Reconnect the cable before using the stacker again. If you will be using the stacker again with the same printer, its height does not need to change. If you attach it to a different printer, you may need to adjust the height. To adjust the height, turn the screw clockwise (as shown below) to move the stacker up, or counterclockwise to move it down. Then connect the stacker to the printer. NOTE: There is a line in the center of the printer and another in the center of the stacker to help you. Move or store the folder Move the folder on its own wheels only over smooth, flat surfaces and do not attempt to go up or down steps. Disconnect the cable before moving or storing the folder. Before using the folder again, adjust its height and reconnect the cable. Replace the folder's tab reel 1. Open the door. 112 Chapter 9 Maintenance ENWW
-
 1
1 -
2
-
3
-
4
-
5
-
6
-
7
-
8
-
9
-
10
-
11
-
12
-
13
-
14
-
15
-
16
-
17
-
18
-
19
-
20
-
21
-
22
-
23
-
24
-
25
-
26
-
27
-
28
-
29
-
30
-
31
-
32
-
33
-
34
-
35
-
36
-
37
-
38
-
39
-
40
-
41
-
42
-
43
-
44
-
45
-
46
-
47
-
48
-
49
-
50
-
51
-
52
-
53
-
54
-
55
-
56
-
57
-
58
-
59
-
60
-
61
-
62
-
63
-
64
-
65
-
66
-
67
-
68
-
69
-
70
-
71
-
72
-
73
-
74
-
75
-
76
-
77
-
78
-
79
-
80
-
81
-
82
-
83
-
84
-
85
-
86
-
87
-
88
-
89
-
90
-
91
-
92
-
93
-
94
-
95
-
96
-
97
-
98
-
99
-
100
-
101
-
102
-
103
-
104
-
105
-
106
-
107
-
108
-
109
-
110
-
111
-
112
-
 113
113 -
 114
114 -
 115
115 -
 116
116 -
 117
117 -
 118
118 -
 119
119 -
 120
120 -
 121
121 -
 122
122 -
 123
123 -
124
-
125
-
126
-
127
-
128
-
129
-
130
-
131
-
132
-
133
-
134
-
135
-
136
-
137
-
138
-
139
-
140
-
141
-
142
 |
 |