Konica Minolta ProJet 160 Cube3 User Guide - Page 20
START, checkmark
 |
View all Konica Minolta ProJet 160 manuals
Add to My Manuals
Save this manual to your list of manuals |
Page 20 highlights
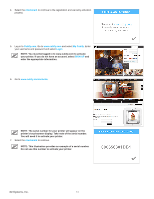
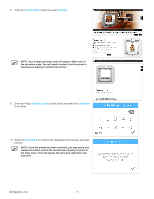
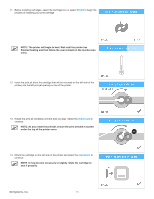
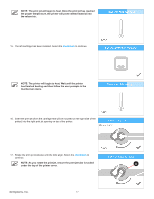
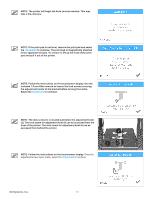
11. Before installing cartridges, select the cartridge icon or select START to begin the process of installing your print cartridge. NOTE: The printer will begin to heat. Wait until the printer has finished heating and then follow the user prompts in the touchscreen menu. 12. Insert the print jet (from the cartridge that will be mounted on the left side of the printer) into the left print jet opening on top of the printer. 13. Rotate the print jet clockwise until the dots (A) align. Select the checkmark to continue NOTE: As you rotate the print jet, ensure the print jet tube is tucked under the top of the printer cover. A 14. Mount the cartridge on the left side of the printer and select the checkmark to continue. NOTE: It may become necessary to slightly rotate the cartridge to seat it properly. 3D Systems, Inc. 16
-
 1
1 -
2
-
3
-
4
-
5
-
6
-
7
-
8
-
9
-
10
-
11
-
12
-
13
-
14
-
 15
15 -
 16
16 -
 17
17 -
 18
18 -
 19
19 -
 20
20 -
 21
21 -
 22
22 -
 23
23 -
 24
24 -
 25
25 -
26
-
27
-
28
-
29
-
30
-
31
-
32
-
33
-
34
-
35
-
36
-
37
-
38
-
39
-
40
-
41
-
42
-
43
-
44
-
45
-
46
-
47
-
48
-
49
-
50
-
51
-
52
-
53
-
54
-
55
-
56
-
57
-
58
-
59
-
60
-
61
-
62
-
63
-
64
-
65
-
66
-
67
-
68
-
69
-
70
-
71
-
72
-
73
-
74
-
75
-
76
-
77
-
78
-
79
-
80
-
81
-
82
-
83
-
84
-
85
-
86
-
87
-
88
-
89
-
90
-
91
-
92
-
93
-
94
-
95
-
96
-
97
-
98
-
99
-
100
-
101
-
102
 |
 |