Konica Minolta ProJet 160 Cube3 User Guide - Page 31
Printing Your Creation
 |
View all Konica Minolta ProJet 160 manuals
Add to My Manuals
Save this manual to your list of manuals |
Page 31 highlights
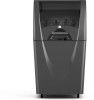
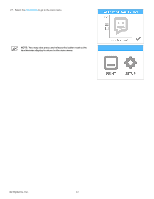
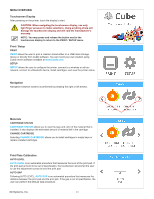
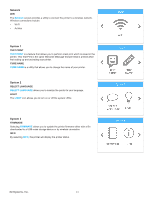
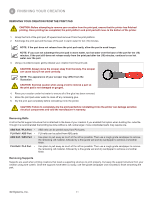
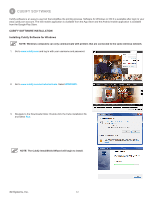
7 PRINTING YOUR CREATION There are many 3D creations available at www.cubify.com. In addition, you can create your own with Cubify Invent and Cubify Sculpt software available at www.cubify.com. The printer can only print .cube3 files. Other file formats like .stl must be processed through Cubify software to become printable. For more information about converting other 3D files to .cube3 print files, refer to the section titled Cubify Software. PRINTING PROCEDURE The following procedure illustrates how to print a creation. Caution: Ensure the print pad is clean before printing. NOTE: For best results, perform the Auto Level and Auto Gap procedures before your first print. NOTE: After every 10 prints, the printer will prompt you to perform the Auto Level and Auto Gap procedures. 1. After powering on your printer, press the touchscreen to begin. 2. Select PRINT. NOTE: If the file is saved on a USB mass storage device, insert the device into the USB inlet port on the printer. NOTE: You may also send the file from the Cubify software to the printer using a wireless connection. Wireless transfer of print files usually takes more time than USB mass storage device transfer. 3. Using the arrows, navigate to the file name of your creation. NOTE: The file name will appear at the top of the display. 3D Systems, Inc. 27
-
 1
1 -
2
-
3
-
4
-
5
-
6
-
7
-
8
-
9
-
10
-
11
-
12
-
13
-
14
-
15
-
16
-
17
-
18
-
19
-
20
-
21
-
22
-
23
-
24
-
25
-
 26
26 -
 27
27 -
 28
28 -
 29
29 -
 30
30 -
 31
31 -
 32
32 -
 33
33 -
 34
34 -
 35
35 -
 36
36 -
37
-
38
-
39
-
40
-
41
-
42
-
43
-
44
-
45
-
46
-
47
-
48
-
49
-
50
-
51
-
52
-
53
-
54
-
55
-
56
-
57
-
58
-
59
-
60
-
61
-
62
-
63
-
64
-
65
-
66
-
67
-
68
-
69
-
70
-
71
-
72
-
73
-
74
-
75
-
76
-
77
-
78
-
79
-
80
-
81
-
82
-
83
-
84
-
85
-
86
-
87
-
88
-
89
-
90
-
91
-
92
-
93
-
94
-
95
-
96
-
97
-
98
-
99
-
100
-
101
-
102
 |
 |