Konica Minolta ProJet 160 Cube3 User Guide - Page 22
checkmark, PRINT
 |
View all Konica Minolta ProJet 160 manuals
Add to My Manuals
Save this manual to your list of manuals |
Page 22 highlights
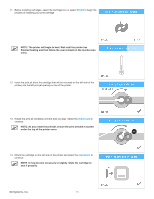
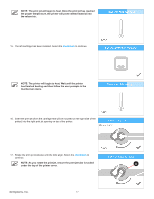
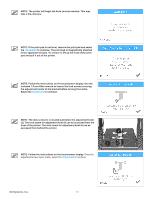
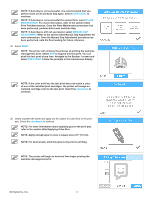
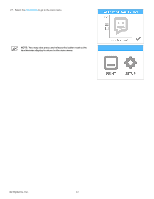
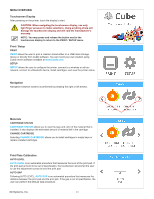
18. Mount the cartridge on the right side of the printer and select the checkmark to continue. NOTE: It may become necessary to slightly rotate the cartridge to seat it properly. NOTE: The print jet will begin to heat. Once the print jet has reached the proper temperature, the printer will prime melted material into the refuse bin. 19. The right cartridge has been installed. Select the checkmark to continue. 20. Select PRINT. 21. It is recommended that Auto Level is performed prior to the first print. Ensure the print pad is clean and installed properly and then select the checkmark to continue to Auto Level. NOTE: When installed properly, the print pad magnetically attaches to the adjustment knobs. 3D Systems, Inc. 18
-
 1
1 -
2
-
3
-
4
-
5
-
6
-
7
-
8
-
9
-
10
-
11
-
12
-
13
-
14
-
15
-
16
-
 17
17 -
 18
18 -
 19
19 -
 20
20 -
 21
21 -
 22
22 -
 23
23 -
 24
24 -
 25
25 -
 26
26 -
 27
27 -
28
-
29
-
30
-
31
-
32
-
33
-
34
-
35
-
36
-
37
-
38
-
39
-
40
-
41
-
42
-
43
-
44
-
45
-
46
-
47
-
48
-
49
-
50
-
51
-
52
-
53
-
54
-
55
-
56
-
57
-
58
-
59
-
60
-
61
-
62
-
63
-
64
-
65
-
66
-
67
-
68
-
69
-
70
-
71
-
72
-
73
-
74
-
75
-
76
-
77
-
78
-
79
-
80
-
81
-
82
-
83
-
84
-
85
-
86
-
87
-
88
-
89
-
90
-
91
-
92
-
93
-
94
-
95
-
96
-
97
-
98
-
99
-
100
-
101
-
102
 |
 |

18
3D Systems, Inc
.
18° Mount the cartridge on the right side of the printer and select the
checkmark
to
continue°
NOTE: It may become necessary to slightly rotate the cartridge to
seat it properly°
NOTE: The print jet will begin to heat° Once the print jet has reached
the proper temperature, the printer will prime melted material into
the refuse bin°
19° The right cartridge has been installed° Select the
checkmark
to continue°
20° Select
PRINT
°
21°
It is recommended that Auto Level is performed prior to the first print. Ensure
the print pad is clean and installed properly and then select the
checkmark
to
continue to Auto Level°
NOTE: When installed properly, the print pad magnetically
attaches to the adjustment knobs°