Konica Minolta bizhub C654 bizhub C654/C754 Network Fax Operations User Guide - Page 101
E-mail Body], Limiting Access to Destinations], User Settings]
 |
View all Konica Minolta bizhub C654 manuals
Add to My Manuals
Save this manual to your list of manuals |
Page 101 highlights
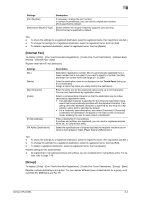
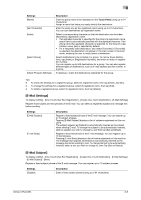
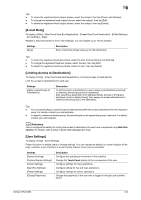
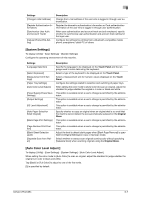
6 Tips - To check the registered fixed subject phrase, select the subject, then tap [Check Job Settings]. - To change the registered fixed subject phrase, select the subject, then tap [Edit]. - To delete the registered fixed subject phrase, select the subject, then tap [Delete]. [E-mail Body] To display: [Utility] - [One-Touch/User Box Registration] - [Create One-Touch Destination] - [E-Mail Settings] - [E-mail Body] - [New] Register a fixed text phrase of the E-mail message. You can register up to 10 text phrases. Settings [Body] Description Enter a fixed text phrase (using up to 256 characters). Tips - To check the registered fixed text phrase, select the text, then tap [Check Job Settings]. - To change the registered fixed text phrase, select the text, then tap [Edit]. - To delete the registered fixed text phrase, select the text, then tap [Delete]. [Limiting Access to Destinations] To display: [Utility] - [One-Touch/User Box Registration] - [Limiting Access to Destinations] Limit the access to destinations for each user. Settings [Apply Levels/Groups to Destinations] Description To limit access to a destination by users, assign a permissible access level or reference allowed group to the destination. After selecting a destination from [Address Book], [Group] or [Program], tap [Apply Level] or [Apply Group], then assign an access allowed level or reference allowed group to the destination. Tips - You can specify [Apply Levels/Groups to Destinations] within the access allowed level for the respective users. For details, contact your administrator. - To specify a reference allowed group, the administrator must register the group in advance. For details, contact your administrator. d Reference How to configure the setting for limiting the access to destinations for each user is explained using Web Connection. For details, refer to [User's Guide: Web Management Tool]. [User Settings] To display: [Utility] - [User Settings] Press this button to enable users to change settings. You can change the defaults or screen displays of the copy, scan/fax, or print function in a user-friendly manner to suit your environment. Settings [System Settings] [Custom Display Settings] [Copier Settings] [Scan/Fax Settings] [Printer Settings] [Change Password] Description Configure the operating environment of this machine. Change the Touch Panel display to the convenience of the user. Configure settings for copy operations. Configure setting for fax and scan operations. Configure settings for printer operations. Change the password of the user who is logged in through user authentication. bizhub C754/C654 6-6
-
 1
1 -
2
-
3
-
4
-
5
-
6
-
7
-
8
-
9
-
10
-
11
-
12
-
13
-
14
-
15
-
16
-
17
-
18
-
19
-
20
-
21
-
22
-
23
-
24
-
25
-
26
-
27
-
28
-
29
-
30
-
31
-
32
-
33
-
34
-
35
-
36
-
37
-
38
-
39
-
40
-
41
-
42
-
43
-
44
-
45
-
46
-
47
-
48
-
49
-
50
-
51
-
52
-
53
-
54
-
55
-
56
-
57
-
58
-
59
-
60
-
61
-
62
-
63
-
64
-
65
-
66
-
67
-
68
-
69
-
70
-
71
-
72
-
73
-
74
-
75
-
76
-
77
-
78
-
79
-
80
-
81
-
82
-
83
-
84
-
85
-
86
-
87
-
88
-
89
-
90
-
91
-
92
-
93
-
94
-
95
-
 96
96 -
 97
97 -
 98
98 -
 99
99 -
 100
100 -
 101
101 -
 102
102 -
 103
103 -
 104
104 -
 105
105 -
 106
106 -
107
-
108
-
109
-
110
-
111
-
112
-
113
-
114
-
115
-
116
-
117
-
118
-
119
-
120
-
121
-
122
-
123
-
124
-
125
-
126
-
127
-
128
-
129
-
130
-
131
-
132
-
133
-
134
-
135
-
136
-
137
-
138
 |
 |