Konica Minolta bizhub C654 bizhub C654/C754 Network Fax Operations User Guide - Page 109
Print/Fax Output Settings], Output Tray Settings], Shift Output Each Job], Date/Time Settings]
 |
View all Konica Minolta bizhub C654 manuals
Add to My Manuals
Save this manual to your list of manuals |
Page 109 highlights
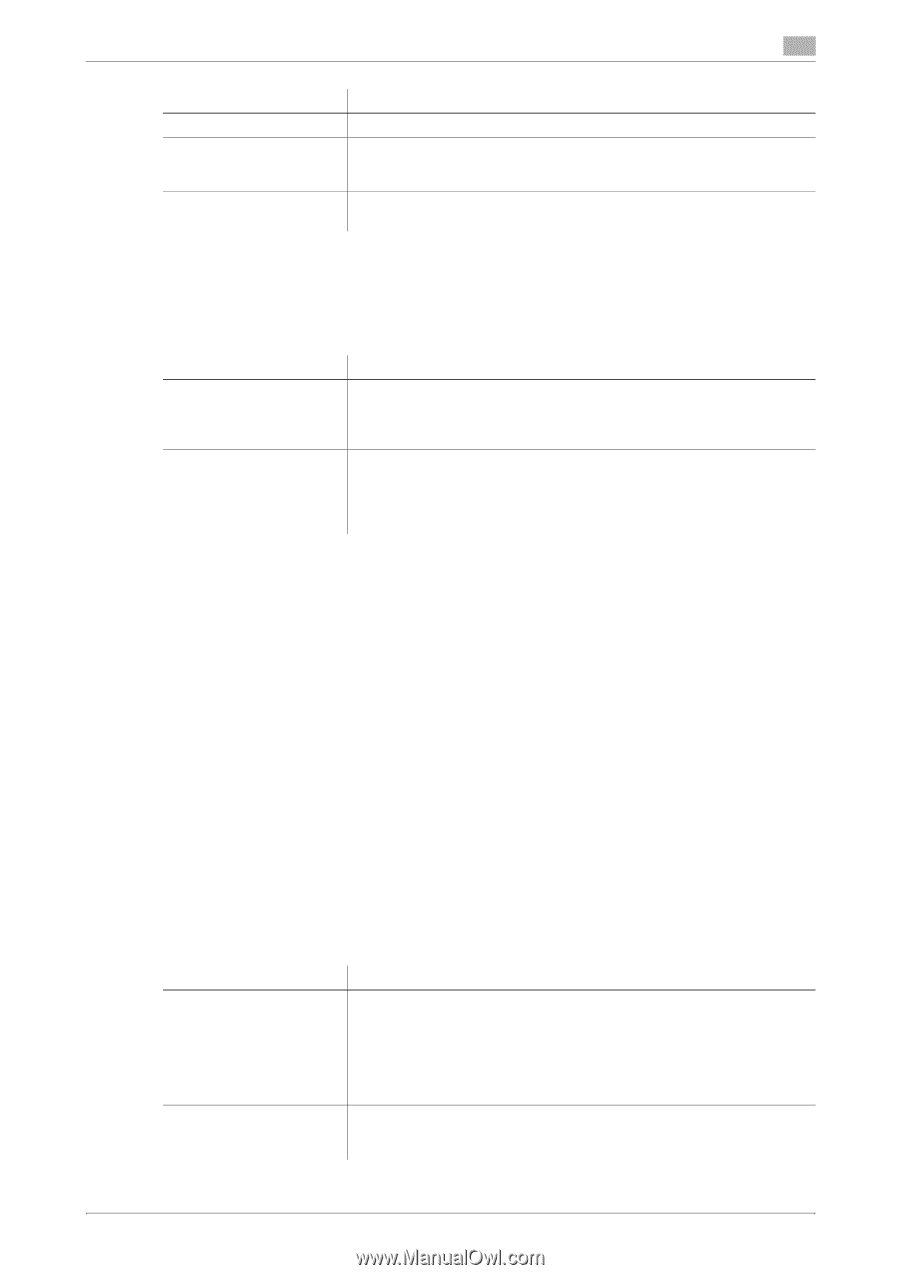
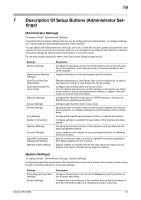
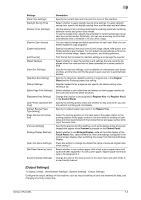
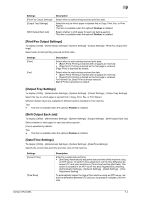
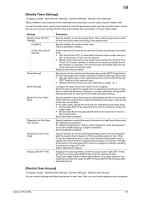
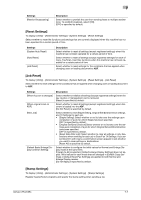
7 Settings [Print/Fax Output Settings] [Output Tray Settings] [Shift Output Each Job] Description Select when to start printing received print/fax data. Select the tray to which paper is ejected first in Copy, Print, Fax, or Print Report. This item is available when the optional Finisher is installed. Select whether to shift paper for each job before ejection. This item is available when the optional Finisher is installed. [Print/Fax Output Settings] To display: [Utility] - [Administrator Settings] - [System Settings] - [Output Settings] - [Print/Fax Output Settings] Select when to start printing received print/fax data. Settings [Print] [Fax] Description Select when to start printing received print data. • [Batch Print]: Printing is started after all pages are received. • [Page Print]: Printing is started as the first page is received. [Page Print] is specified by default. Select when to start printing received fax data. • [Batch Print]: Printing is started after all pages are received. • [Page Print]: Printing is started as the first page is received. For Internet Fax, Batch Print is always selected. [Batch Print] is specified by default. [Output Tray Settings] To display: [Utility] - [Administrator Settings] - [System Settings] - [Output Settings] - [Output Tray Settings] Select the tray to which paper is ejected first in Copy, Print, Fax, or Print Report. Different default values are available for different options installed on this machine. Tips - This item is available when the optional Finisher is installed. [Shift Output Each Job] To display: [Utility] - [Administrator Settings] - [System Settings] - [Output Settings] - [Shift Output Each Job] Select whether to shift paper for each job before ejection. [Yes] is specified by default. Tips - This item is available when the optional Finisher is installed. [Date/Time Settings] To display: [Utility] - [Administrator Settings] - [System Settings] - [Date/Time Settings] Specify the current date and time and time zone of this machine. Settings [Current Time] [Time Zone] Description Enter the current date and time. • [Set Date]: Automatically adjust the date and time of this machine using an NTP server. To perform time adjustment, set the time difference between UTC and your local time in [Time Zone] and tap [Set Date]. This button is available if an NTP server has been registered by selecting [Administrator Settings] - [Network Settings] - [Detail Settings] - [Time Adjustment Setting]. To automatically adjust the time of this machine using an NTP server, set the time difference between UTC and your local area in multiples of 30 minutes. bizhub C754/C654 7-4
-
 1
1 -
2
-
3
-
4
-
5
-
6
-
7
-
8
-
9
-
10
-
11
-
12
-
13
-
14
-
15
-
16
-
17
-
18
-
19
-
20
-
21
-
22
-
23
-
24
-
25
-
26
-
27
-
28
-
29
-
30
-
31
-
32
-
33
-
34
-
35
-
36
-
37
-
38
-
39
-
40
-
41
-
42
-
43
-
44
-
45
-
46
-
47
-
48
-
49
-
50
-
51
-
52
-
53
-
54
-
55
-
56
-
57
-
58
-
59
-
60
-
61
-
62
-
63
-
64
-
65
-
66
-
67
-
68
-
69
-
70
-
71
-
72
-
73
-
74
-
75
-
76
-
77
-
78
-
79
-
80
-
81
-
82
-
83
-
84
-
85
-
86
-
87
-
88
-
89
-
90
-
91
-
92
-
93
-
94
-
95
-
96
-
97
-
98
-
99
-
100
-
101
-
102
-
103
-
 104
104 -
 105
105 -
 106
106 -
 107
107 -
 108
108 -
 109
109 -
 110
110 -
 111
111 -
 112
112 -
 113
113 -
 114
114 -
115
-
116
-
117
-
118
-
119
-
120
-
121
-
122
-
123
-
124
-
125
-
126
-
127
-
128
-
129
-
130
-
131
-
132
-
133
-
134
-
135
-
136
-
137
-
138
 |
 |