Kyocera KM-C830D KM-C830 Operation Guide Rev-1B - Page 24
Important
 |
View all Kyocera KM-C830D manuals
Add to My Manuals
Save this manual to your list of manuals |
Page 24 highlights
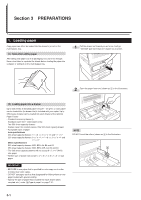
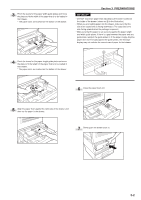
3 Pinch the levers for the paper width guide plates and move the plates to fit the width of the paper that is to be loaded in that drawer. * The paper sizes are marked on the bottom of the drawer. 4 Pinch the levers for the paper length guide plate and move the plate to fit the length of the paper that is to be loaded in that drawer. * The paper sizes are marked on the bottom of the drawer. Section 3 PREPARATIONS IMPORTANT! • DO NOT load more paper than indicated by the sticker located on the inside of the drawer (shown as 3 in the illustration). • When you are loading paper into the drawer, make sure that the side to be copied onto is facing downward. (The copy side is the side facing upward when the package is opened.) • Make sure that the paper is set securely against the paper length and width guide plates. If there is a gap between the paper and any guide plate, readjust the guide plates to fit the paper snugly. Anytime paper does not fit snugly against the guide plates, the message display may not indicate the correct size of paper for that drawer. 3 6 Close the paper feed unit. 5 Align the paper flush against the right side of the drawer, and then set the paper in the drawer. 7 Gently push the drawer back in. 3-2
-
 1
1 -
2
-
3
-
4
-
5
-
6
-
7
-
8
-
9
-
10
-
11
-
12
-
13
-
14
-
15
-
16
-
17
-
18
-
 19
19 -
 20
20 -
 21
21 -
 22
22 -
 23
23 -
 24
24 -
 25
25 -
 26
26 -
 27
27 -
 28
28 -
 29
29 -
30
-
31
-
32
-
33
-
34
-
35
-
36
-
37
-
38
-
39
-
40
-
41
-
42
-
43
-
44
-
45
-
46
-
47
-
48
-
49
-
50
-
51
-
52
-
53
-
54
-
55
-
56
-
57
-
58
-
59
-
60
-
61
-
62
-
63
-
64
-
65
-
66
-
67
-
68
-
69
-
70
-
71
-
72
-
73
-
74
-
75
-
76
-
77
-
78
-
79
-
80
-
81
-
82
-
83
-
84
-
85
-
86
-
87
-
88
-
89
-
90
-
91
-
92
-
93
-
94
-
95
-
96
-
97
-
98
-
99
-
100
-
101
-
102
-
103
-
104
-
105
-
106
-
107
-
108
-
109
-
110
-
111
-
112
-
113
-
114
-
115
-
116
-
117
-
118
-
119
-
120
-
121
-
122
-
123
-
124
-
125
-
126
-
127
-
128
-
129
-
130
-
131
-
132
-
133
-
134
-
135
-
136
-
137
-
138
-
139
-
140
-
141
-
142
-
143
-
144
-
145
-
146
-
147
-
148
-
149
-
150
-
151
-
152
-
153
-
154
-
155
-
156
-
157
-
158
-
159
-
160
-
161
 |
 |
