Kyocera KM-C830D KM-C830 Operation Guide Rev-1B - Page 37
Basic Operation
 |
View all Kyocera KM-C830D manuals
Add to My Manuals
Save this manual to your list of manuals |
Page 37 highlights
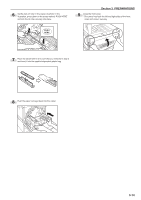
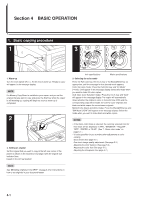
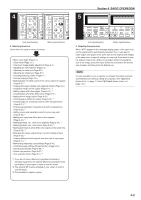
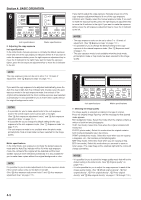
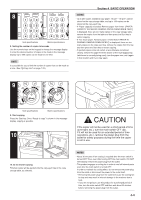
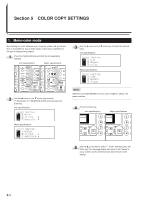
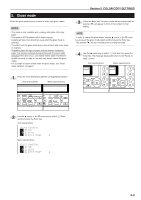
Section 4 BASIC OPERATION 1. Basic copying procedure 1 3 1. Warm-up Turn the main switch ON ( | ). At the end of warm-up, "Ready to copy." will appear in the message display. NOTE If a Memory Copy Board is installed in your copier, and you set the original that you want to copy and press the Start key while the copier is still warming up, copying will begin as soon as warm-up is completed. 2 2. Setting an original Set the original that you want to copy at the left-rear corner of the platen as shown in the illustration and align it with the original size indicator lines. based on the left rear position. NOTE See "G Setting originals in the SRDF" on page 8-2 for instructions on how to set originals in your document feeder. Inch specifications Metric specifications 3. Selecting the color mode Press the Full Color key, the A.C.S. key or the Black&White key, as appropriate, until the message for that desired mode appears. Color (full color mode): Press the Full Color key and "4C Mode" ["4-COL."] will appear in the message display. Select this mode when you want to make full color copies. ACS (Auto Color Selection mode): Press the A.C.S. key and "ACS" will appear in the message display. The copier will automatically detect whether the original is color or monochrome (B/W) and the corresponding copy will be made: full color for color originals and black and white copies for monochrome originals. Monochrome (black and white mode): Press the Black&White key and "BW Mode" ["B/W"] will appear in the message display. Select this mode when you want to make black and white copies. NOTES • If the mono-color mode is selected, the currently selected color for that mode will be displayed: "CYAN", "MAGENTA", "YELLOW", "RED", "GREEN" or "BLUE". (See "1. Mono-color mode" on page 5-1.) • It is also possible for you to make other adjustments to color copying. Gloss mode (See page 5-2.) One-touch image quality adjustment (See page 5-3.) Adjusting the color balance (See page 5-4.) Adjusting the color hue (See page 5-5.) Adjusting the sharpness (See page 5-7.) 4-1
-
 1
1 -
2
-
3
-
4
-
5
-
6
-
7
-
8
-
9
-
10
-
11
-
12
-
13
-
14
-
15
-
16
-
17
-
18
-
19
-
20
-
21
-
22
-
23
-
24
-
25
-
26
-
27
-
28
-
29
-
30
-
31
-
 32
32 -
 33
33 -
 34
34 -
 35
35 -
 36
36 -
 37
37 -
 38
38 -
 39
39 -
 40
40 -
 41
41 -
 42
42 -
43
-
44
-
45
-
46
-
47
-
48
-
49
-
50
-
51
-
52
-
53
-
54
-
55
-
56
-
57
-
58
-
59
-
60
-
61
-
62
-
63
-
64
-
65
-
66
-
67
-
68
-
69
-
70
-
71
-
72
-
73
-
74
-
75
-
76
-
77
-
78
-
79
-
80
-
81
-
82
-
83
-
84
-
85
-
86
-
87
-
88
-
89
-
90
-
91
-
92
-
93
-
94
-
95
-
96
-
97
-
98
-
99
-
100
-
101
-
102
-
103
-
104
-
105
-
106
-
107
-
108
-
109
-
110
-
111
-
112
-
113
-
114
-
115
-
116
-
117
-
118
-
119
-
120
-
121
-
122
-
123
-
124
-
125
-
126
-
127
-
128
-
129
-
130
-
131
-
132
-
133
-
134
-
135
-
136
-
137
-
138
-
139
-
140
-
141
-
142
-
143
-
144
-
145
-
146
-
147
-
148
-
149
-
150
-
151
-
152
-
153
-
154
-
155
-
156
-
157
-
158
-
159
-
160
-
161
 |
 |
