Kyocera KM-C830D KM-C830 Operation Guide Rev-1B - Page 63
Select Erase effect
 |
View all Kyocera KM-C830D manuals
Add to My Manuals
Save this manual to your list of manuals |
Page 63 highlights
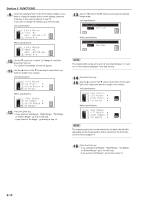
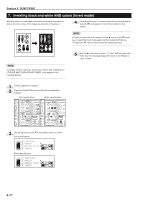
2 Press the Digital Editing key to light the corresponding indicator. Inch specifications Metric specifications Section 6 FUNCTIONS 5 Press the Enter key. • If you selected "z Sheet Erase" or "x Book Erase", go to the next step. • If you selected "c Custom Sheet", go directly to step 8. NOTE In order to use the "c Custom Sheet" setting, the size of the original that is being copied must be registered in advance. (See "& Custom erase size" on page 7-21.) 3 Use the M cursor or the N cursor key to select "c Border Erase" and then press the Enter key. The "Select Erase effect" screen will appear. Inch specifications 6 Use the M cursor or the N cursor key to select the width of the border that you want to have erased. Inch specifications Metric specifications Metric specifications 4 Use the M cursor or the N cursor key to select the border erase mode that you want to use. Inch specifications Metric specifications NOTES • The width of the border to be erased can be set to either 1/4", 1/2" or 3/4" [6 mm, 12 mm or 18 mm]. • The arrow (>) indicates the current setting. 7 Press the Enter key. 8 Use the M cursor key to select "z Enter" and then press the Enter key. The message display will return to the "Ready to copy." screen. 6-16
-
 1
1 -
2
-
3
-
4
-
5
-
6
-
7
-
8
-
9
-
10
-
11
-
12
-
13
-
14
-
15
-
16
-
17
-
18
-
19
-
20
-
21
-
22
-
23
-
24
-
25
-
26
-
27
-
28
-
29
-
30
-
31
-
32
-
33
-
34
-
35
-
36
-
37
-
38
-
39
-
40
-
41
-
42
-
43
-
44
-
45
-
46
-
47
-
48
-
49
-
50
-
51
-
52
-
53
-
54
-
55
-
56
-
57
-
 58
58 -
 59
59 -
 60
60 -
 61
61 -
 62
62 -
 63
63 -
 64
64 -
 65
65 -
 66
66 -
 67
67 -
 68
68 -
69
-
70
-
71
-
72
-
73
-
74
-
75
-
76
-
77
-
78
-
79
-
80
-
81
-
82
-
83
-
84
-
85
-
86
-
87
-
88
-
89
-
90
-
91
-
92
-
93
-
94
-
95
-
96
-
97
-
98
-
99
-
100
-
101
-
102
-
103
-
104
-
105
-
106
-
107
-
108
-
109
-
110
-
111
-
112
-
113
-
114
-
115
-
116
-
117
-
118
-
119
-
120
-
121
-
122
-
123
-
124
-
125
-
126
-
127
-
128
-
129
-
130
-
131
-
132
-
133
-
134
-
135
-
136
-
137
-
138
-
139
-
140
-
141
-
142
-
143
-
144
-
145
-
146
-
147
-
148
-
149
-
150
-
151
-
152
-
153
-
154
-
155
-
156
-
157
-
158
-
159
-
160
-
161
 |
 |
