Kyocera KM-C830D KM-C830 Operation Guide Rev-1B - Page 26
Setting the paper size for the multi-bypass tray, Inch specifications, Metric specifications
 |
View all Kyocera KM-C830D manuals
Add to My Manuals
Save this manual to your list of manuals |
Page 26 highlights
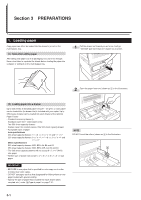
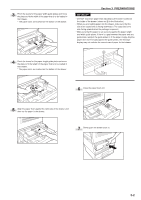
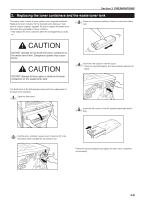
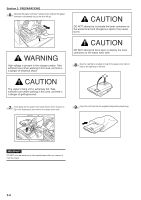
3 Slide the paper all the way in, along the insert guides, as far as it will go. IMPORTANT! • When you are loading paper onto the multi-bypass tray, make sure that the side to be copied onto is facing upward. (The copy side is the side facing upward when the package is opened.) If the leading edge of the paper is curled at all, straighten it out before setting it on the multi-bypass tray. • If you are copying onto special paper, be sure to have finished copies ejected onto the copy eject tray. (See ") Eject destination" on page 7-22.) • Be sure to push the multi-bypass extension back in, and open the insert guides as far as they will go BEFORE closing the multibypass tray. Section 3 PREPARATIONS G Setting the paper size for the multi-bypass tray It is necessary to select the size of paper that will be set on the multibypass tray. The acceptable sizes of paper are as follows. Inch specifications Custom sizes (4" x 5 7/8" - 11" x 17"), 5 1/2" x 8 1/2", 8 1/2" x 11", 8 1/2" x 14", 11" x 8 1/2", 11" x 17" and 12" x 18" Metric specifications Custom sizes (100 mm x 148 mm - 297 mm x 420 mm), B6R, B5, B5R, A6R, A5R, A4, A4R, B4, A3, A3 wide and Folio 1 Press the Paper Select key. The "Select paper size for bypass" ["SELECT PAPER SIZE OF BYPASS"] screen will appear. Inch specifications Metric specifications 2 Use the M cursor or the N cursor key to select the appropriate paper size and then press the Enter key. Inch specifications Metric specifications 3-4
-
 1
1 -
2
-
3
-
4
-
5
-
6
-
7
-
8
-
9
-
10
-
11
-
12
-
13
-
14
-
15
-
16
-
17
-
18
-
19
-
20
-
 21
21 -
 22
22 -
 23
23 -
 24
24 -
 25
25 -
 26
26 -
 27
27 -
 28
28 -
 29
29 -
 30
30 -
 31
31 -
32
-
33
-
34
-
35
-
36
-
37
-
38
-
39
-
40
-
41
-
42
-
43
-
44
-
45
-
46
-
47
-
48
-
49
-
50
-
51
-
52
-
53
-
54
-
55
-
56
-
57
-
58
-
59
-
60
-
61
-
62
-
63
-
64
-
65
-
66
-
67
-
68
-
69
-
70
-
71
-
72
-
73
-
74
-
75
-
76
-
77
-
78
-
79
-
80
-
81
-
82
-
83
-
84
-
85
-
86
-
87
-
88
-
89
-
90
-
91
-
92
-
93
-
94
-
95
-
96
-
97
-
98
-
99
-
100
-
101
-
102
-
103
-
104
-
105
-
106
-
107
-
108
-
109
-
110
-
111
-
112
-
113
-
114
-
115
-
116
-
117
-
118
-
119
-
120
-
121
-
122
-
123
-
124
-
125
-
126
-
127
-
128
-
129
-
130
-
131
-
132
-
133
-
134
-
135
-
136
-
137
-
138
-
139
-
140
-
141
-
142
-
143
-
144
-
145
-
146
-
147
-
148
-
149
-
150
-
151
-
152
-
153
-
154
-
155
-
156
-
157
-
158
-
159
-
160
-
161
 |
 |
