Kyocera KM-C830D KM-C830 Operation Guide Rev-1B - Page 60
Select Front Margin
 |
View all Kyocera KM-C830D manuals
Add to My Manuals
Save this manual to your list of manuals |
Page 60 highlights
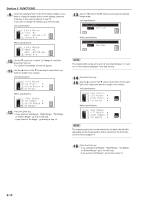
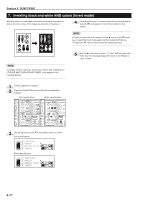
Section 6 FUNCTIONS 9 Check the settings shown for the front & back margins. If you want to create the margins at the current settings, press the Enter key. In this case, go directly to step 19. If you want to change the settings, go to the next step. Inch specifications 13 Use the O cursor or the P cursor key to select the desired margin width. Inch specifications Metric specifications Metric specifications 10 Use the N cursor key to select "x Change #", and then press the Enter key. The "Select Front Margin" screen will appear. 11 Use the M cursor or the N cursor key to select where you want the margin to be created. Inch specifications Metric specifications NOTE The margin width can be set to any 1/8" increment between 1/4" and 3/4" [1 mm increment between 1 mm and 18 mm]. 14 Press the Enter key. 15 Use the M cursor or the N cursor key to where on the back side of the copies you want the margin to be created. Inch specifications 12 Press the Enter key. • If you selected "Left Margin", "Right Margin", "Top Margin" or "Bottom Margin", go to the next step. • If you selected "No Margin", go directly to step 15. Metric specifications NOTE The margin position that can be selected for the back side will differ depending on the margin position that is selected for the front side. See the chart on page 6-11. 16 Press the Enter key. • If you selected "Left Margin", "Right Margin", "Top Margin" or "Bottom Margin", go to the next step. • If you selected "No Margin", go directly to step 19. 6-13
-
 1
1 -
2
-
3
-
4
-
5
-
6
-
7
-
8
-
9
-
10
-
11
-
12
-
13
-
14
-
15
-
16
-
17
-
18
-
19
-
20
-
21
-
22
-
23
-
24
-
25
-
26
-
27
-
28
-
29
-
30
-
31
-
32
-
33
-
34
-
35
-
36
-
37
-
38
-
39
-
40
-
41
-
42
-
43
-
44
-
45
-
46
-
47
-
48
-
49
-
50
-
51
-
52
-
53
-
54
-
 55
55 -
 56
56 -
 57
57 -
 58
58 -
 59
59 -
 60
60 -
 61
61 -
 62
62 -
 63
63 -
 64
64 -
 65
65 -
66
-
67
-
68
-
69
-
70
-
71
-
72
-
73
-
74
-
75
-
76
-
77
-
78
-
79
-
80
-
81
-
82
-
83
-
84
-
85
-
86
-
87
-
88
-
89
-
90
-
91
-
92
-
93
-
94
-
95
-
96
-
97
-
98
-
99
-
100
-
101
-
102
-
103
-
104
-
105
-
106
-
107
-
108
-
109
-
110
-
111
-
112
-
113
-
114
-
115
-
116
-
117
-
118
-
119
-
120
-
121
-
122
-
123
-
124
-
125
-
126
-
127
-
128
-
129
-
130
-
131
-
132
-
133
-
134
-
135
-
136
-
137
-
138
-
139
-
140
-
141
-
142
-
143
-
144
-
145
-
146
-
147
-
148
-
149
-
150
-
151
-
152
-
153
-
154
-
155
-
156
-
157
-
158
-
159
-
160
-
161
 |
 |
