Kyocera KM-C830D KM-C830 Operation Guide Rev-1B - Page 70
Preparing presentation materials to go with transparencies, Presentation mode]
 |
View all Kyocera KM-C830D manuals
Add to My Manuals
Save this manual to your list of manuals |
Page 70 highlights
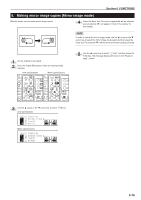
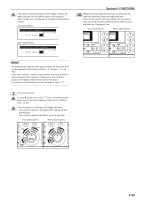
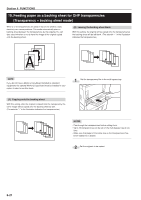
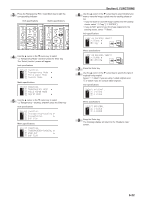
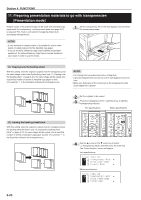
Section 6 FUNCTIONS 11. Preparing presentation materials to go with transparencies [Presentation mode] Multiple copies of the original image can be made onto standard copy paper while the transparency + backing sheet mode (see page 6-21) is selected. This mode is convenient for preparing materials to accompany transparencies. 1 Set the transparency film in the multi-bypass tray and select the transparency mode. NOTES • If your machine is a duplex copier, it is possible for you to make duplex (2-sided) copies onto the standard copy paper. • If you do not have a Memory Copy Board installed as standard equipment, the optional Memory Copy Board must be installed in your copier in order to use this mode. (1) Copying onto the backing sheet With this setting, after the original is copied onto the transparency and the same image copied onto the backing sheet (see "(1) Copying onto the backing sheet" on page 6-21), the same image will be copied onto a specified number of sheets of standard copy paper as well. (The asterisk "∗" in the illustration indicates the transparencies.) NOTES • Fan through the transparencies before setting them. • Up to 25 transparencies can be set on the multi-bypass tray at one time. • Make sure that paper of the same size as the transparencies has been loaded into a drawer. 2 Set the originals to be copied. 3 Press the Transparency Film / Card Stock key to light the corresponding indicator. Inch specifications Metric specifications (2) Leaving the backing sheet blank With this setting, after the original is copied onto the transparency but the backing sheet left blank (see "(2) Leaving the backing sheet blank" on page 6-21) the same image will be copied onto a specified number of sheets of standard copy paper as well. (The asterisk "∗" in the illustration indicates the transparencies.) 4 Use the M cursor or the N cursor key to select "z Transparency Mode" and then press the Enter key. The "Select function" screen will appear. Inch specifications Metric specifications 6-23
-
 1
1 -
2
-
3
-
4
-
5
-
6
-
7
-
8
-
9
-
10
-
11
-
12
-
13
-
14
-
15
-
16
-
17
-
18
-
19
-
20
-
21
-
22
-
23
-
24
-
25
-
26
-
27
-
28
-
29
-
30
-
31
-
32
-
33
-
34
-
35
-
36
-
37
-
38
-
39
-
40
-
41
-
42
-
43
-
44
-
45
-
46
-
47
-
48
-
49
-
50
-
51
-
52
-
53
-
54
-
55
-
56
-
57
-
58
-
59
-
60
-
61
-
62
-
63
-
64
-
 65
65 -
 66
66 -
 67
67 -
 68
68 -
 69
69 -
 70
70 -
 71
71 -
 72
72 -
 73
73 -
 74
74 -
 75
75 -
76
-
77
-
78
-
79
-
80
-
81
-
82
-
83
-
84
-
85
-
86
-
87
-
88
-
89
-
90
-
91
-
92
-
93
-
94
-
95
-
96
-
97
-
98
-
99
-
100
-
101
-
102
-
103
-
104
-
105
-
106
-
107
-
108
-
109
-
110
-
111
-
112
-
113
-
114
-
115
-
116
-
117
-
118
-
119
-
120
-
121
-
122
-
123
-
124
-
125
-
126
-
127
-
128
-
129
-
130
-
131
-
132
-
133
-
134
-
135
-
136
-
137
-
138
-
139
-
140
-
141
-
142
-
143
-
144
-
145
-
146
-
147
-
148
-
149
-
150
-
151
-
152
-
153
-
154
-
155
-
156
-
157
-
158
-
159
-
160
-
161
 |
 |
