Motorola i580 User Manual - Page 56
Assigning a Speed Dial Number or Voice Name, Storing Numbers Faster, Voice Name
 |
View all Motorola i580 manuals
Add to My Manuals
Save this manual to your list of manuals |
Page 56 highlights
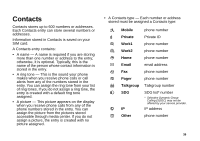
Contacts Tip: If an entry has a picture assigned and you want the entry to have no picture, select [No Picture] or press A under Unassign. 4 When you are finished, press A under Back. Only ring tones stored in your phone's memory are available while creating a Contracts entry. To assign a ring tone stored on a memory card inserted in your phone's memory card slot, you must create the Contacts entry and then go to the media center to assign the ring tone to it, if your service provider offers this feature. Not all audio files can be assigned as ring tones. See "Rules for Assigning Ring Tones" on page 126. Pictures stored on the memory card can be assigned to Contacts while creating a Contacts entry. If you choose a picture that is stored on the memory card, that picture file is automatically copied or moved to your phone's memory according to the rules described in "Pictures Stored on the Memory Card" on page 124. Assigning a Speed Dial Number or Voice Name 1 If you have not already, select [Options]. 2 The default Speed Dial number assigned to a phone number is displayed in the Speed # field. This is always the next available Speed Dial location. 42 If you want to assign the phone number to a different Speed Dial location: With the Speed # field highlighted, press O. Press A under Delete to delete the current Speed Dial number. Enter the new Speed Dial number using the keypad. When you are finished, press O. 3 If you want to create a voice name for a phone number, select Voice Name. As directed by the screen prompts, say and repeat the name you want to assign to the number. Speak clearly into the microphone. 4 When you are finished, press A under Back. Storing Numbers Faster To store numbers to Contacts from the recent calls list, see "Storing Items to Contacts" on page 36. To store numbers to Contacts from Memo, see "Memo" on page 66. To store numbers to Contacts from the idle screen: 1 Use the keypad to enter the number you want to store. 2 Press m.
-
 1
1 -
2
-
3
-
4
-
5
-
6
-
7
-
8
-
9
-
10
-
11
-
12
-
13
-
14
-
15
-
16
-
17
-
18
-
19
-
20
-
21
-
22
-
23
-
24
-
25
-
26
-
27
-
28
-
29
-
30
-
31
-
32
-
33
-
34
-
35
-
36
-
37
-
38
-
39
-
40
-
41
-
42
-
43
-
44
-
45
-
46
-
47
-
48
-
49
-
50
-
 51
51 -
 52
52 -
 53
53 -
 54
54 -
 55
55 -
 56
56 -
 57
57 -
 58
58 -
 59
59 -
 60
60 -
 61
61 -
62
-
63
-
64
-
65
-
66
-
67
-
68
-
69
-
70
-
71
-
72
-
73
-
74
-
75
-
76
-
77
-
78
-
79
-
80
-
81
-
82
-
83
-
84
-
85
-
86
-
87
-
88
-
89
-
90
-
91
-
92
-
93
-
94
-
95
-
96
-
97
-
98
-
99
-
100
-
101
-
102
-
103
-
104
-
105
-
106
-
107
-
108
-
109
-
110
-
111
-
112
-
113
-
114
-
115
-
116
-
117
-
118
-
119
-
120
-
121
-
122
-
123
-
124
-
125
-
126
-
127
-
128
-
129
-
130
-
131
-
132
-
133
-
134
-
135
-
136
-
137
-
138
-
139
-
140
-
141
-
142
-
143
-
144
-
145
-
146
-
147
-
148
-
149
-
150
-
151
-
152
-
153
-
154
-
155
-
156
-
157
-
158
-
159
-
160
-
161
-
162
-
163
-
164
-
165
-
166
-
167
-
168
-
169
-
170
-
171
-
172
-
173
-
174
-
175
-
176
-
177
-
178
-
179
-
180
-
181
-
182
-
183
-
184
-
185
-
186
-
187
-
188
-
189
-
190
-
191
-
192
-
193
-
194
-
195
-
196
-
197
-
198
-
199
-
200
-
201
-
202
-
203
-
204
-
205
-
206
-
207
-
208
-
209
-
210
-
211
-
212
-
213
-
214
-
215
-
216
-
217
-
218
-
219
-
220
-
221
-
222
-
223
-
224
-
225
-
226
-
227
-
228
-
229
-
230
-
231
-
232
-
233
 |
 |