Sharp MX 4501N Quick Start Guide - Page 51
Selecting Printer Driver Settings
 |
View all Sharp MX 4501N manuals
Add to My Manuals
Save this manual to your list of manuals |
Page 51 highlights
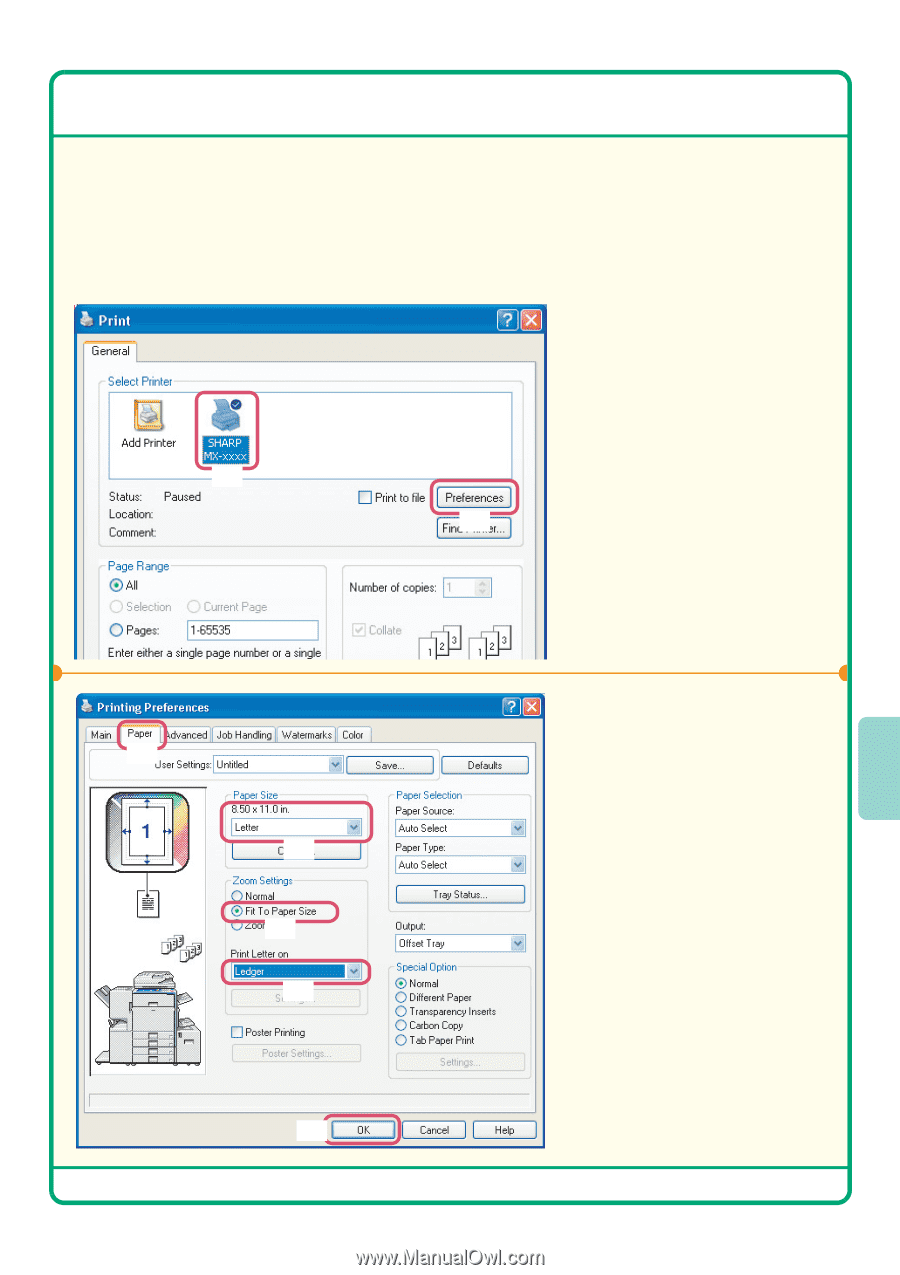
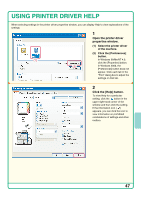
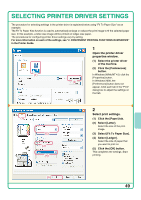
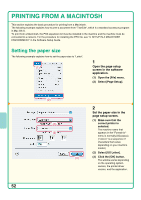
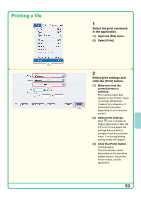
SELECTING PRINTER DRIVER SETTINGS The procedure for selecting settings in the printer driver is explained below using "Fit To Paper Size" as an example. The Fit To Paper Size function is used to automatically enlarge or reduce the print image to fit the selected paper size. In this example, a letter-size image will be printed on ledger-size paper. The procedures for configuring printer driver settings vary by setting. For more information on each of the settings, see "2. CONVENIENT PRINTING FUNCTIONS IN WINDOWS" in the Printer Guide. 1 Open the printer driver properties window. (1) Select the printer driver of the machine. (2) Click the [Preferences] button. (1) In Windows 98/Me/NT 4.0, click the [Properties] button. (2) In Windows 2000, the [Preferences] button does not appear. Click each tab in the "Print" dialog box to adjust the settings on that tab. (1) (2) (3) (4) 2 Select print settings. (1) Click the [Paper] tab. (2) Select [Letter]. Select the size of the print image. (3) Select [Fit To Paper Size]. (4) Select [Ledger]. Select the size of paper that you want to print on. (5) Click the [OK] button. This completes the settings. Start printing. (5) 49
-
 1
1 -
2
-
3
-
4
-
5
-
6
-
7
-
8
-
9
-
10
-
11
-
12
-
13
-
14
-
15
-
16
-
17
-
18
-
19
-
20
-
21
-
22
-
23
-
24
-
25
-
26
-
27
-
28
-
29
-
30
-
31
-
32
-
33
-
34
-
35
-
36
-
37
-
38
-
39
-
40
-
41
-
42
-
43
-
44
-
45
-
 46
46 -
 47
47 -
 48
48 -
 49
49 -
 50
50 -
 51
51 -
 52
52 -
 53
53 -
 54
54 -
 55
55 -
 56
56 -
57
-
58
-
59
-
60
-
61
-
62
-
63
-
64
-
65
-
66
-
67
-
68
-
69
-
70
-
71
-
72
-
73
-
74
-
75
-
76
-
77
-
78
-
79
-
80
-
81
-
82
-
83
-
84
-
85
-
86
-
87
-
88
 |
 |