Sharp MX 4501N Quick Start Guide - Page 71
Selecting Special Modes For The, Scanner Function
 |
View all Sharp MX 4501N manuals
Add to My Manuals
Save this manual to your list of manuals |
Page 71 highlights
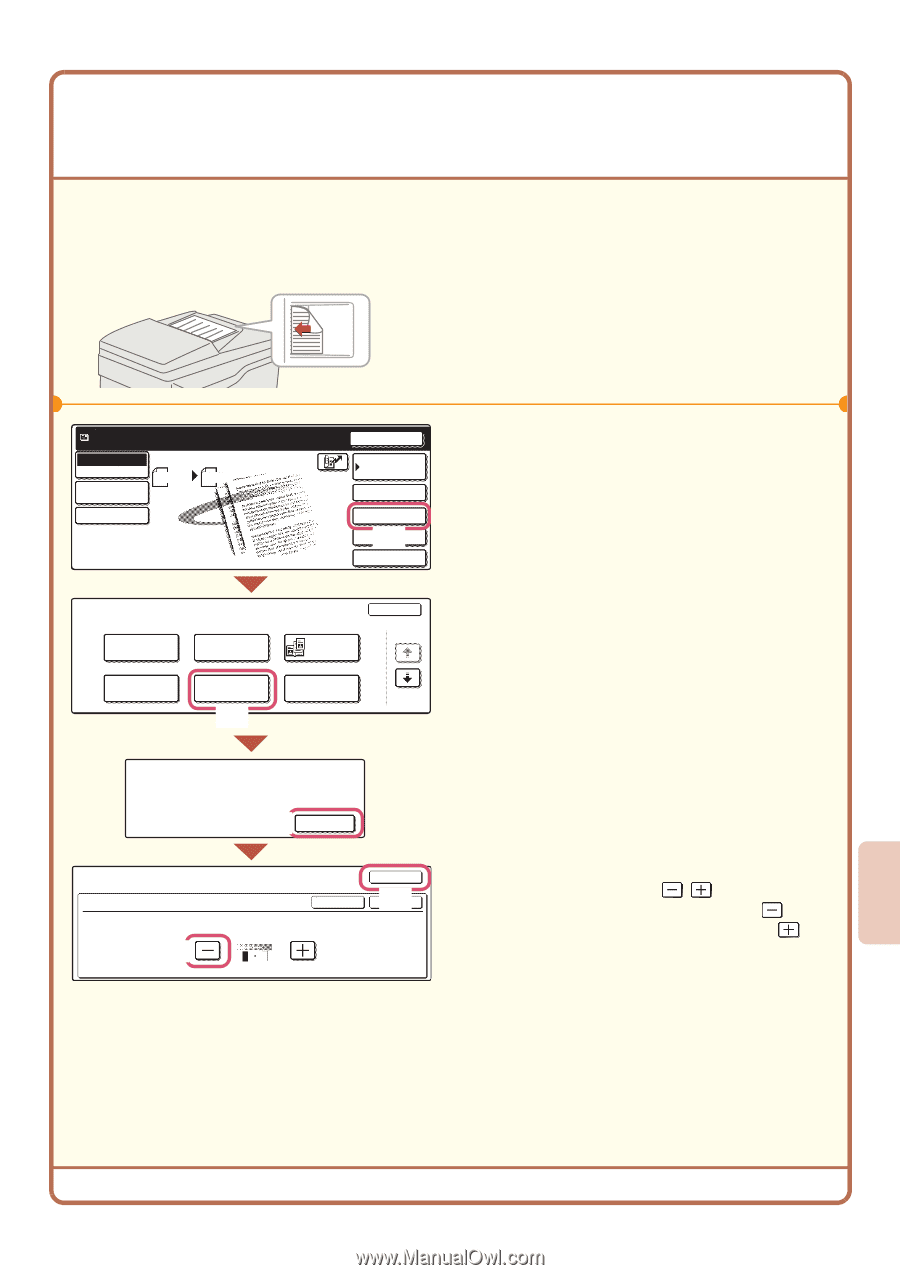
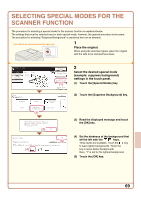
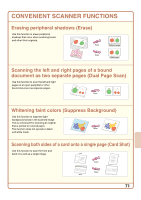
SELECTING SPECIAL MODES FOR THE SCANNER FUNCTION The procedure for selecting a special mode for the scanner function is explained below. The settings that must be selected vary for each special mode, however, the general procedure is the same. The procedure for selecting "Suppress Background" is explained here as an example. The side to be scanned must be face up! 1 Place the original. When using the document glass, place the original with the side to be scanned face down. Ready to send. Scan Mode Switch Image Settings Scan 81/2x11 Send Settings Send Auto Resend Address Book Address Entry Special Modes (F1ile) Quick File Scan Special Modes Program Timer Erase Suppress Background (2) Dual Page Scan Card Shot OK 1/2 This function may not apply if sent by Black & White [Start]. (Mono2 selection) (3) OK Special Modes Suppress Background Cancel OK (5OK) Light areas of the original may be suppressed as background. (4) 13 2 Select the desired special mode (example: suppress background) settings in the touch panel. (1) Touch the [Special Modes] key. (2) Touch the [Suppress Background] key. (3) Read the displayed message and touch the [OK] key. (4) Set the darkness of the background that will be left with the keys. Three levels are available. Touch the key to leave lighter backgrounds. Touch the key to leave darker backgrounds. Here, "1" is set for the lightest background. (5) Touch the [OK] key. 69
-
 1
1 -
2
-
3
-
4
-
5
-
6
-
7
-
8
-
9
-
10
-
11
-
12
-
13
-
14
-
15
-
16
-
17
-
18
-
19
-
20
-
21
-
22
-
23
-
24
-
25
-
26
-
27
-
28
-
29
-
30
-
31
-
32
-
33
-
34
-
35
-
36
-
37
-
38
-
39
-
40
-
41
-
42
-
43
-
44
-
45
-
46
-
47
-
48
-
49
-
50
-
51
-
52
-
53
-
54
-
55
-
56
-
57
-
58
-
59
-
60
-
61
-
62
-
63
-
64
-
65
-
 66
66 -
 67
67 -
 68
68 -
 69
69 -
 70
70 -
 71
71 -
 72
72 -
 73
73 -
 74
74 -
 75
75 -
 76
76 -
77
-
78
-
79
-
80
-
81
-
82
-
83
-
84
-
85
-
86
-
87
-
88
 |
 |