Sharp MX 4501N Quick Start Guide - Page 70
Special Scan Modes
 |
View all Sharp MX 4501N manuals
Add to My Manuals
Save this manual to your list of manuals |
Page 70 highlights
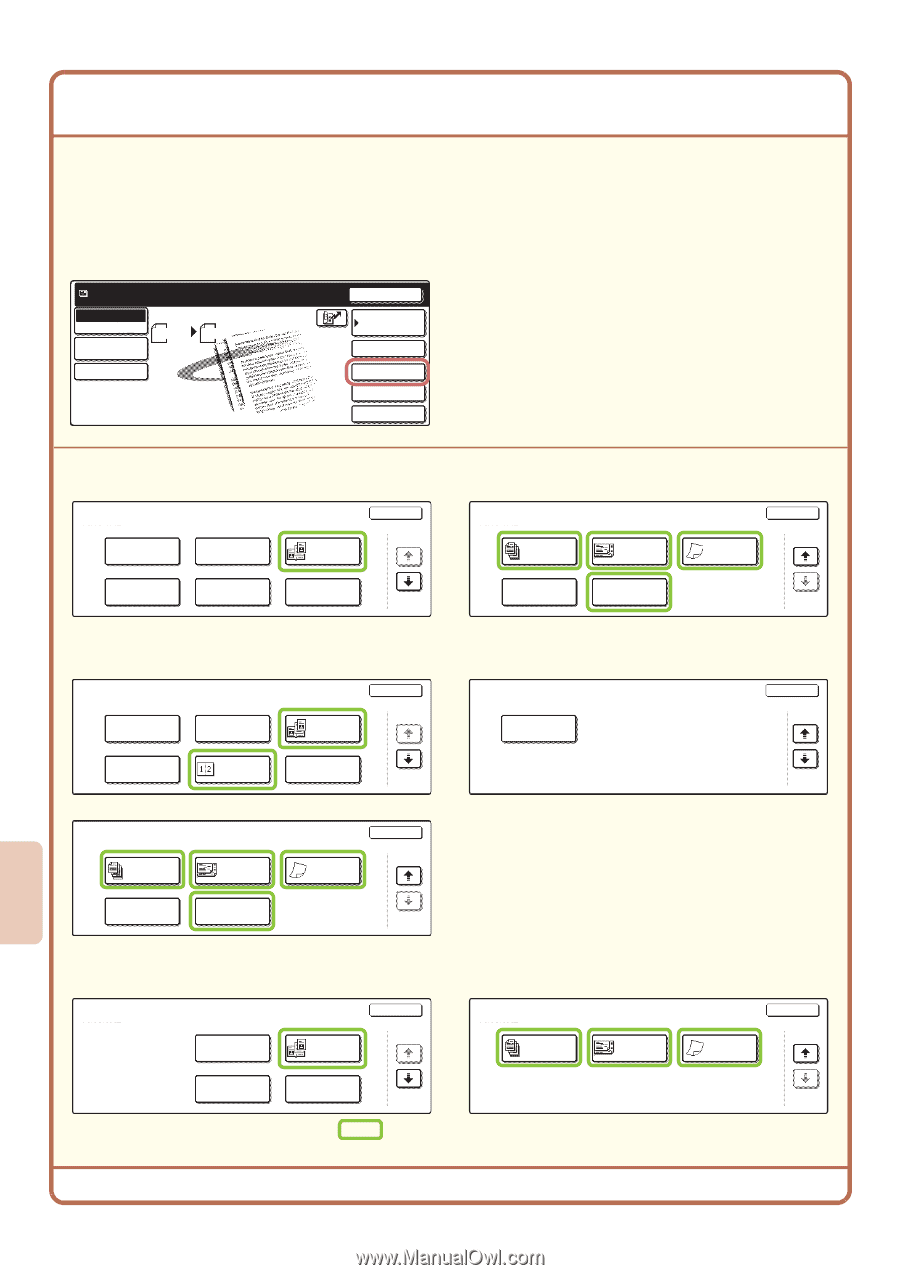
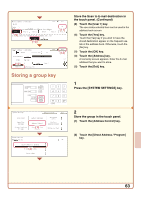
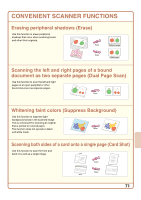
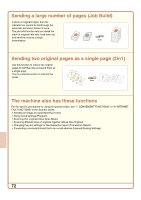
SPECIAL SCAN MODES The special modes make it possible to perform a variety of scan transmissions for specific purposes. The following pages show the types of scan transmissions that can be performed. (The procedures for using each special mode are not explained.) Each special mode has its own settings and procedures, however, the basic procedure is the same for all modes. The basic procedure for selecting a special mode is explained on the next page using "Suppress Background" as an example. For the specific procedures for using the special modes, see "7. CONVENIENT FUNCTIONS" in the Scanner Guide. Ready to send. Scan Mode Switch Image Settings Scan 81/2x11 Send Settings Send Auto Resend Address Book Address Entry Special Modes File Quick File To use a special mode, open the special modes menu and touch the key of mode that you wish to use. The menu varies depending on whether scan mode, Internet fax mode, or USB memory scan mode is selected. Touch the [Special Modes] key in the base screen to open the special modes menu. (You can also open the special modes menu by touching the [Special Modes] key that appears after the [Image Settings] key is touched.) Scan mode 1st screen 2nd screen Scan Special Modes Program Erase Dual Page Scan OK 1/2 Scan Special Modes Job Build Mixed Size Original Slow Scan Mode OK 2/2 Timer Suppress Background Card Shot File Quick File Internet fax mode 1st screen Internet Fax Special Modes Program Erase Dual Page Scan OK 1/3 2nd screen Internet Fax Special Modes Transaction Report OK 2/3 Timer 3rd screen Internet Fax Special Modes Job Build 2in1 Card Shot Mixed Size Original Slow Scan Mode OK 3/3 File Quick File USB memory scan mode 1st screen USB Mem. Scan Special Modes Erase Dual Page Scan OK 1/2 2nd screen USB Mem. Scan Special Modes Job Build Mixed Size Original Slow Scan Mode OK 2/2 Suppress Background Card Shot When a special mode key encircled by is touched, the key is highlighted and the setting is completed. The keys that appear will vary depending on what peripheral devices are installed. 68
-
 1
1 -
2
-
3
-
4
-
5
-
6
-
7
-
8
-
9
-
10
-
11
-
12
-
13
-
14
-
15
-
16
-
17
-
18
-
19
-
20
-
21
-
22
-
23
-
24
-
25
-
26
-
27
-
28
-
29
-
30
-
31
-
32
-
33
-
34
-
35
-
36
-
37
-
38
-
39
-
40
-
41
-
42
-
43
-
44
-
45
-
46
-
47
-
48
-
49
-
50
-
51
-
52
-
53
-
54
-
55
-
56
-
57
-
58
-
59
-
60
-
61
-
62
-
63
-
64
-
 65
65 -
 66
66 -
 67
67 -
 68
68 -
 69
69 -
 70
70 -
 71
71 -
 72
72 -
 73
73 -
 74
74 -
 75
75 -
76
-
77
-
78
-
79
-
80
-
81
-
82
-
83
-
84
-
85
-
86
-
87
-
88
 |
 |