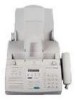
Sharp UX-4000M Service Manual - Page 8
Connections, Installing the Toner Cartridge . - drum cartridge
 |
View all Sharp UX-4000M manuals
Add to My Manuals
Save this manual to your list of manuals |
Page 8 highlights
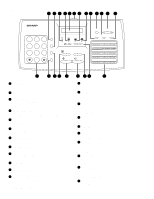
UX-4000MU FO-2950MU/C 2 Grasp the finger hold on the toner cartridge handle where it is marked PUSH, and pull the handle out. Rehold the handle and pull the toner cartridge out of the compartment. • Place the toner cartridge on a sheet of paper on a level surface. 6 Gently pull the paper tab to remove the black sheet of protective paper from the drum cartridge. • Be careful not the tear the paper or leave any pieces of paper in the machine 3 Grasp the tabs on the drum cartridge handle and gently pull the cartridge out of the machine. 7 Replace the toner cartridge and reset the drum counter. (Refer to Installing the Toner Cartridge .) 4. Connections 1 Connecting the Handset Connect the handset as shown and place it on the handset rest. • The ends of the handset cord are identical, so they will go into either jack. 4 Remove the new drum cartridge from its packaging. 5 Insert the drum cartridge into the print compartment, aligning the guides on the cartridge with the runners on the sides of the compartment. 1 - 6 manuals4you.com
-
 1
1 -
2
-
 3
3 -
 4
4 -
 5
5 -
 6
6 -
 7
7 -
 8
8 -
 9
9 -
 10
10 -
 11
11 -
 12
12 -
 13
13 -
14
-
15
-
16
-
17
-
18
-
19
-
20
-
21
-
22
-
23
-
24
-
25
-
26
-
27
-
28
-
29
-
30
-
31
-
32
-
33
-
34
-
35
-
36
-
37
-
38
-
39
-
40
-
41
-
42
-
43
-
44
-
45
-
46
-
47
-
48
-
49
-
50
-
51
-
52
-
53
-
54
-
55
-
56
-
57
-
58
-
59
-
60
-
61
-
62
-
63
-
64
-
65
-
66
-
67
-
68
-
69
-
70
-
71
-
72
-
73
-
74
-
75
-
76
-
77
-
78
-
79
-
80
-
81
-
82
-
83
-
84
-
85
-
86
-
87
-
88
-
89
-
90
-
91
-
92
-
93
-
94
-
95
-
96
-
97
-
98
-
99
-
100
-
101
-
102
-
103
-
104
-
105
-
106
-
107
-
108
-
109
-
110
-
111
-
112
-
113
-
114
-
115
-
116
-
117
-
118
-
119
-
120
-
121
-
122
-
123
-
124
-
125
-
126
-
127
-
128
-
129
-
130
-
131
-
132
-
133
-
134
-
135
-
136
-
137
-
138
-
139
-
140
-
141
-
142
-
143
-
144
-
145
-
146
-
147
-
148
-
149
-
150
-
151
-
152
-
153
-
154
-
155
-
156
-
157
-
158
-
159
-
160
-
161
-
162
-
163
-
164
-
165
-
166
-
167
-
168
-
169
-
170
-
171
-
172
-
173
-
174
-
175
-
176
-
177
-
178
-
179
-
180
-
181
-
182
-
183
-
184
-
185
-
186
-
187
-
188
-
189
-
190
-
191
-
192
-
193
-
194
-
195
-
196
-
197
-
198
-
199
-
200
-
201
-
202
-
203
-
204
-
205
-
206
-
207
-
208
-
209
-
210
-
211
-
212
-
213
-
214
-
215
-
216
-
217
-
218
-
219
-
220
-
221
-
222
-
223
-
224
-
225
-
226
-
227
-
228
-
229
-
230
-
231
-
232
 |
 |
