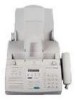
Sharp UX-4000M Service Manual - Page 9
Tel. Line, Do Not, Tel. Set, Tone, 2=pulse - fax machine
 |
View all Sharp UX-4000M manuals
Add to My Manuals
Save this manual to your list of manuals |
Page 9 highlights
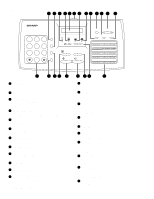
2 Connecting the power cord Plug the power cord into a 120 V, 60 Hz, grounded AC (3-prong) outlet. • Caution! Do not plug the power cord into any other kind of outlet. This will damage the machine and is not covered under the warranty. UX-4000MU FO-2950MU/C 2) Press 1 to select tone dialing, or 2 to select pulse dialing. TONE PLUSE 1 or 2 3) Press the STOP key to return to the date and time display. STOP The machine does not have a power on/off switch, so the power is turned on and off by simply plugging in or unplugging the power cord. • Note: If your area experiences a high incidence of lightning or power surges, we recommend that you install surge protectors for the power and telephone lines. Surge protectors can be purchased at most telephone specialty stores. 3 Connecting the telephone line cord. Insert one end of the line cord into the jack on the back of the machine marked TEL. LINE. Insert the other end into a standard (RJ11C) single-line wall telephone jack. 4 Attaching the paper tray and document supports. 1) Attach the paper tray. 2) Attach the received document tray. Be sure to insert the line into the TEL. LINE jack. Do not insert it into the TEL. SET jack. 3) Attach the original document support. • Make sure the front side of the support faces you (the support should curve slightly toward you). • Note: Your fax is set for tone dialing. If you are on a pulse dial line, you must set your fax for pulse dialing. Press the keys on the operation panel as follows: 1) Press these keys. FUNCTION 4 The display will show: DIAL MODE 1=TONE, 2=PULSE 5 Extension phone (optional). If desired, you can connect an extension phone to the TEL. SET jack on the fax. 1) Remove the seal covering the TEL. SET jack. 1 - 7
-
 1
1 -
2
-
3
-
 4
4 -
 5
5 -
 6
6 -
 7
7 -
 8
8 -
 9
9 -
 10
10 -
 11
11 -
 12
12 -
 13
13 -
 14
14 -
15
-
16
-
17
-
18
-
19
-
20
-
21
-
22
-
23
-
24
-
25
-
26
-
27
-
28
-
29
-
30
-
31
-
32
-
33
-
34
-
35
-
36
-
37
-
38
-
39
-
40
-
41
-
42
-
43
-
44
-
45
-
46
-
47
-
48
-
49
-
50
-
51
-
52
-
53
-
54
-
55
-
56
-
57
-
58
-
59
-
60
-
61
-
62
-
63
-
64
-
65
-
66
-
67
-
68
-
69
-
70
-
71
-
72
-
73
-
74
-
75
-
76
-
77
-
78
-
79
-
80
-
81
-
82
-
83
-
84
-
85
-
86
-
87
-
88
-
89
-
90
-
91
-
92
-
93
-
94
-
95
-
96
-
97
-
98
-
99
-
100
-
101
-
102
-
103
-
104
-
105
-
106
-
107
-
108
-
109
-
110
-
111
-
112
-
113
-
114
-
115
-
116
-
117
-
118
-
119
-
120
-
121
-
122
-
123
-
124
-
125
-
126
-
127
-
128
-
129
-
130
-
131
-
132
-
133
-
134
-
135
-
136
-
137
-
138
-
139
-
140
-
141
-
142
-
143
-
144
-
145
-
146
-
147
-
148
-
149
-
150
-
151
-
152
-
153
-
154
-
155
-
156
-
157
-
158
-
159
-
160
-
161
-
162
-
163
-
164
-
165
-
166
-
167
-
168
-
169
-
170
-
171
-
172
-
173
-
174
-
175
-
176
-
177
-
178
-
179
-
180
-
181
-
182
-
183
-
184
-
185
-
186
-
187
-
188
-
189
-
190
-
191
-
192
-
193
-
194
-
195
-
196
-
197
-
198
-
199
-
200
-
201
-
202
-
203
-
204
-
205
-
206
-
207
-
208
-
209
-
210
-
211
-
212
-
213
-
214
-
215
-
216
-
217
-
218
-
219
-
220
-
221
-
222
-
223
-
224
-
225
-
226
-
227
-
228
-
229
-
230
-
231
-
232
 |
 |
