Sony Ericsson Xperia XA Ultra User Guide - Page 8
Screen protection, Starting your device for the first time, Settings, Storage & memory, Advanced
 |
View all Sony Ericsson Xperia XA Ultra manuals
Add to My Manuals
Save this manual to your list of manuals |
Page 8 highlights
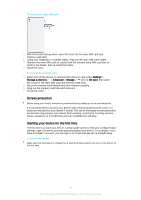
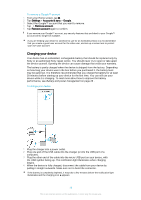
To remove the nano SIM card 1 With the screen facing down, open the cover for the nano SIM card and memory card slots. 2 Using your fingernail or a similar object, drag out the nano SIM card holder. 3 Remove the nano SIM card (or cards) from the relevant nano SIM card slot (or slots) in the holder, then re-insert the holder. 4 Close the cover. To remove the memory card 1 Either turn off the device, or unmount the memory card under Settings > Storage & memory > > Advanced > Storage > next to SD card, then open the cover for the nano SIM card and memory card slots. 2 Press the memory card inwards and then release it quickly. 3 Drag out the memory card fully and remove it. 4 Close the cover. Screen protection Before using your device, remove the protection film by pulling up on the protruding tab. It is recommended to protect your device with a Sony branded screen cover or a protector intended for your Xperia™ model. The use of third party screen protection accessories may prevent your device from working correctly by covering sensors, lenses, speakers, or microphones and can invalidate the warranty. Starting your device for the first time The first time you start your device, a setup guide opens to help you configure basic settings, sign in to some accounts and personalise your device. For example, if you have a Google™ account, you can sign in to it here and get set up straight away. To turn on the device Make sure that the battery is charged for at least 30 minutes before you turn on the device for the first time. 8 This is an Internet version of this publication. © Print only for private use.
-
 1
1 -
2
-
 3
3 -
 4
4 -
 5
5 -
 6
6 -
 7
7 -
 8
8 -
 9
9 -
 10
10 -
 11
11 -
 12
12 -
 13
13 -
14
-
15
-
16
-
17
-
18
-
19
-
20
-
21
-
22
-
23
-
24
-
25
-
26
-
27
-
28
-
29
-
30
-
31
-
32
-
33
-
34
-
35
-
36
-
37
-
38
-
39
-
40
-
41
-
42
-
43
-
44
-
45
-
46
-
47
-
48
-
49
-
50
-
51
-
52
-
53
-
54
-
55
-
56
-
57
-
58
-
59
-
60
-
61
-
62
-
63
-
64
-
65
-
66
-
67
-
68
-
69
-
70
-
71
-
72
-
73
-
74
-
75
-
76
-
77
-
78
-
79
-
80
-
81
-
82
-
83
-
84
-
85
-
86
-
87
-
88
-
89
-
90
-
91
-
92
-
93
-
94
-
95
-
96
-
97
-
98
-
99
-
100
-
101
-
102
-
103
-
104
-
105
-
106
-
107
-
108
-
109
-
110
-
111
-
112
-
113
-
114
-
115
-
116
-
117
-
118
-
119
-
120
-
121
-
122
-
123
-
124
-
125
-
126
-
127
-
128
-
129
-
130
-
131
-
132
 |
 |
