Sony DSR 250 Operating Instructions - Page 10
Setting up the type of the battery pack - used
 |
UPC - 027242579514
View all Sony DSR 250 manuals
Add to My Manuals
Save this manual to your list of manuals |
Page 10 highlights
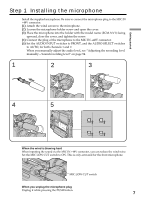
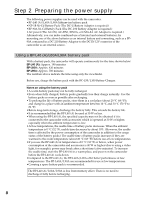
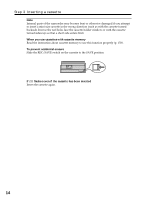
Step 2 Preparing the power supply Setting up the type of the battery pack Set up the type of the battery pack installed to the camcorder, using the menu. If you do not set the type, the battery remaining indicator will not indicate the correct capacity. (1) Push the CUSTOM PRESET/MENU switch in the MENU direction and release it to display the menu. (2) Turn the SEL/PUSH EXEC dial to select , then press the dial. (3) Turn the SEL/PUSH EXEC dial to select uREMAIN, then press the dial. (4) Turn the SEL/PUSH EXEC dial to select the type of the battery pack, then press the dial. Setting Meaning LI-ION NI-CD When using a lithium-ion battery pack (BP-L40 (A)/L60A/L90A) When using a nicad battery pack (NP-1B/BP-90A) (5) Push the CUSTOM PRESET/MENU switch in the MENU direction and release it to make the menu disappear. 1 TC/UB SET TC PRESET UB PRESET TC FORMAT TC RUN TC MAKE UB T I ME 2,3 CUSTOM PRESET MENU [MENU] : END 5 SETUP MENU CLOCK SET LTR S I ZE REMA I N CUSTOM PRESET MENU 4 SETUP MENU CLOCK SET [MENU] L: TERNDS I ZE REMA I N RETURN LI-ION NI-CD [MENU] : END When the battery capacity is low The BATT and REC lamps (red) in the viewfinder and the TALLY lamps on the camcorder will flash. 10
-
 1
1 -
2
-
3
-
4
-
 5
5 -
 6
6 -
 7
7 -
 8
8 -
 9
9 -
 10
10 -
 11
11 -
 12
12 -
 13
13 -
 14
14 -
 15
15 -
16
-
17
-
18
-
19
-
20
-
21
-
22
-
23
-
24
-
25
-
26
-
27
-
28
-
29
-
30
-
31
-
32
-
33
-
34
-
35
-
36
-
37
-
38
-
39
-
40
-
41
-
42
-
43
-
44
-
45
-
46
-
47
-
48
-
49
-
50
-
51
-
52
-
53
-
54
-
55
-
56
-
57
-
58
-
59
-
60
-
61
-
62
-
63
-
64
-
65
-
66
-
67
-
68
-
69
-
70
-
71
-
72
-
73
-
74
-
75
-
76
-
77
-
78
-
79
-
80
-
81
-
82
-
83
-
84
-
85
-
86
-
87
-
88
-
89
-
90
-
91
-
92
-
93
-
94
-
95
-
96
-
97
-
98
-
99
-
100
-
101
-
102
-
103
-
104
-
105
-
106
-
107
-
108
-
109
-
110
-
111
-
112
-
113
-
114
-
115
-
116
-
117
-
118
-
119
-
120
-
121
-
122
-
123
-
124
-
125
-
126
-
127
-
128
-
129
-
130
-
131
-
132
-
133
-
134
-
135
-
136
-
137
-
138
-
139
-
140
-
141
-
142
-
143
-
144
-
145
-
146
-
147
-
148
-
149
-
150
-
151
-
152
-
153
-
154
-
155
-
156
-
157
-
158
-
159
-
160
-
161
-
162
-
163
-
164
-
165
-
166
-
167
-
168
-
169
-
170
-
171
-
172
-
173
-
174
-
175
-
176
-
177
-
178
-
179
-
180
-
181
-
182
-
183
-
184
-
185
-
186
-
187
-
188
-
189
-
190
-
191
-
192
 |
 |